home is where my story begins...

  • Home
  • Quilting and Sewing
  • Baking
  • Cooking
  • Decorating
  • Garden
  • Featured On
  • Contact Me

Graham Cracker Gingerbread Houses

November 11, 2015   By Becca 5 Comments

One of the moms, at the school I teach at, recently asked me for the frosting recipe and directions for the gingerbread houses we make in the classroom.  I love hosting a Gingerbread Party for my students and siblings, and I also host a party for my kids and their friends too.

For the past 10 years, we’ve hosted friends and family and created the most adorable graham cracker houses.  Lining the table with butcher paper or wrapping paper is a MUST!  It makes clean up super easy. You just fold all of the garbage right into to paper that is on the table and clean up is done!

The kids have gotten better and better every year and patiently working on their houses.


I had a lot of fun with my bokeh pictures too.  (Bokeh is the blurry background that produces the pretty lights from the tree.)


I ask every family to bring a candy item to share. My favorite candies for gingerbread house decorating are Lifesavers, Neccos, small candy canes, red hots, red and green M&M’s, Twizzlers Pull Apart licorice, gumdrops, and  pretzel twists. (Pretzel twists make great fences.)


When the kids were little, I prepared the house bases ahead of time, so all they had to do was add the roof and candy. I still prepare the houses ahead of time for Kindergarten.  (Actually, my parent volunteers prepare them.) Since my kids at home are bigger, we just build and create! Sometimes the candy houses turn into candy fortresses.

Here’s how I build the bases when young kids (first grade and under) are decorating with us.  The only reason I do the base for the kids is that it is very frustrating when you are 4 years old and your house falls apart every time you try to add candy.  Royal icing needs time to dry and harden.  Patience is hard when you’re 4. Building the house bases is really easy.  I start with foil covered cardboard.  They make simple platforms for the kids to create their “yard”. I cut the graham crackers with a bread knife and assemble the house base with royal icing.  I always use the royal icing to “glue” the house base to the platform. This is what an assembled house base looks like when it is ready for the party to start..  I make one for each child and a few extras in case we have an accident. 


I let the kids add the two pieces for the roof and all of the decorations.  Royal icing is best for assembling houses and decorating.  I usually make several batches of Royal icing and put it into individual quart sized freezer bags. (Don’t use sandwich bags because they pop.) When it’s time for decorating, I just snip off a small corner of the bag.

The recipe for Royal Icing is included in the package of Wilton Meringue Powder.  I buy my meringue powder at Michael’s.  If you can’t find meringue powder, I’m sure you can google a recipe for a similar icing that calls for egg whites.  I’ve always used the meringue powder recipe because raw eggs freak me out. (Unless, of course, I’m eating cookie dough.)

3 Tbsp Wilton Meringue Powder
4 cups sifted powdered sugar
5 or 6 Tbsp warm water

Beat all ingredients, with heavy duty mixer, until icing forms peaks. (7-10 minutes)

Here are a few examples from our gingerbread party last year.  

This one was Rudolph’s barn.

This is a gingerbread manger.

If you’ve never done this before, this is the year to give it a try.  My kids always look forward to this day.  I’ll admit, I’ve toned it down over the years.  The first few years we invited about 30 kids and their parents, served lunch, and hosted all-out party.  Now, we just have family.  There are 10 kids and one crazy mom who just loves being the Gingerbread Queen.
Happy Decorating!


Happy Holidays!

Posted by Picasa

Share this:

  • Click to share on Facebook (Opens in new window)
  • Click to share on Twitter (Opens in new window)
  • Click to share on Pinterest (Opens in new window)

Filed Under: Kids, Miscellaneous, Photography Tagged With: Christmas, gingerbread

The Tween Bedroom Makeover

October 13, 2015   By Becca Leave a Comment

Just when we had my daughter’s bedroom all organized, the bedroom furniture in place, and the new quilt made, we were given Great Grandma’s bedroom set.  It’s good problem because the bedroom set is beautiful and my daughter loves having a bigger bed. 
Today we moved the picture wall to the opposite side of the room.  Last week I bought a new comforter for the bed. I didn’t even let me daughter go shopping with me.  I knew it had to match her quilt and look good with her bedding because I wasn’t even going to consider repainting.  The gray in the comforter is the same gray that is in the quilt.  It’s the softest comforter you could ever imagine, so she wasn’t too sad that I didn’t let her pick her own bedding.
While decorating her room, it’s hard for me to keep in mind that she’s still eleven years old.  Even though the picture frames and bulletin board don’t really look the best with a beautiful bedroom set like this one, they still get to stay.  

Will you just look at this beautiful sleigh bed?

The bookshelves above this dresser will need to move eventually, to make room for the mirror that goes along with the set.  Plus, she can’t actually reach the books.  The poster of the puppy dog, thumb-tacked to the wall, gets to stay too… against my better judgement.

Here’s the second dresser in the set.  It’s so pretty. All of the special treasures on top of the dresser got to stay too.  Everyone needs a magic 8 ball, a lava lamp, and a piggy bank colored with Sharpie markers.

The quilt doesn’t actually fit on the bed anymore, but it makes a nice throw.

Oh, and I’d like you to meet Paul.  He is the largest stuffed animal I’ve ever seen in my life and he lives at my house.  Paul gets to stay too.

Happy redecorating!

Nap-Time Creations
Dolen Diaries

Share this:

  • Click to share on Facebook (Opens in new window)
  • Click to share on Twitter (Opens in new window)
  • Click to share on Pinterest (Opens in new window)

Filed Under: Decorating, Kids, Miscellaneous Tagged With: kids rooms, quilts

Time To Make Pesto!

September 28, 2015   By Becca 1 Comment

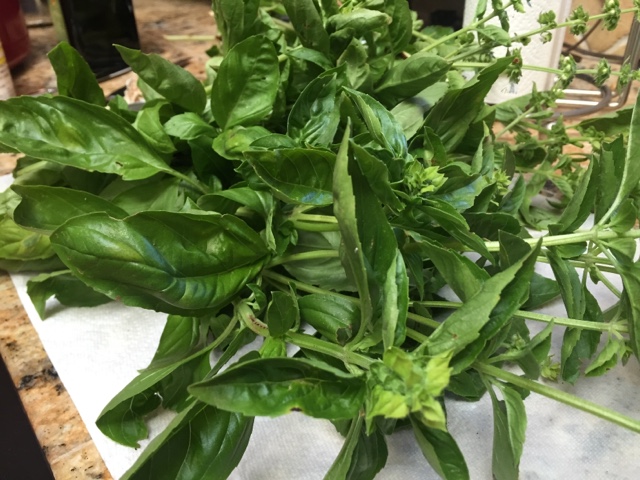
My garden is overflowing with basil this year.  We have had a warm and dry summer, with very little rain, and my basil plants were VERY happy with those conditions.  Last year I waited too long to use the last of my basil and the frost got to it first.  This year, I made better choices.  I chopped that basil down and brought it inside for some pesto-yumminess.  This is from just one plant.
Oh, the smell!  I made all of the teenage boys, who were at my house watching football, smell the basil and appreciate the home grown goodness.  (They are good kids and happily smelled the basil and pretended to care that I was going to make pesto.)
Sometimes, when I make pesto, I just throw in a little of this and a little of that.  This time, I actually measured.  Here’s what I did.
I put the following ingredients into the food processor:
2 cups packed basil
4 small cloves of garlic
3/4 cup of pine nuts
3/4 cup olive oil
1/2 cup grated Parmesan cheese
3/4 teaspoon natural sea salt
After a few second in the food processor, it’s all done!
I was able to make several batches with the basil from my garden, so I put some in mini jars and put them in the freezer.  I was really wishing that I had ice cube trays because I think that would have worked out better for freezing.  Oh well, maybe next year.  
***Here’s a little tip.  Pine nuts are not cheap. If you are making lots of pesto, buy the big bag from Costco.***
I made those teenage boys some sandwiches with my (borrowed) panani press (thank you Leslie).  The sandwiches had sourdough bread, homemade pesto, turkey, provolone cheese, and sundried tomatoes.  They enjoyed the sandwiches and told me the pesto was really good… I told you they were good kids!
Happy pesto making!

Share this:

  • Click to share on Facebook (Opens in new window)
  • Click to share on Twitter (Opens in new window)
  • Click to share on Pinterest (Opens in new window)

Filed Under: Cooking, Garden, Kids, Miscellaneous

Creating An Outdoor Learning Space

April 9, 2015   By Becca Leave a Comment

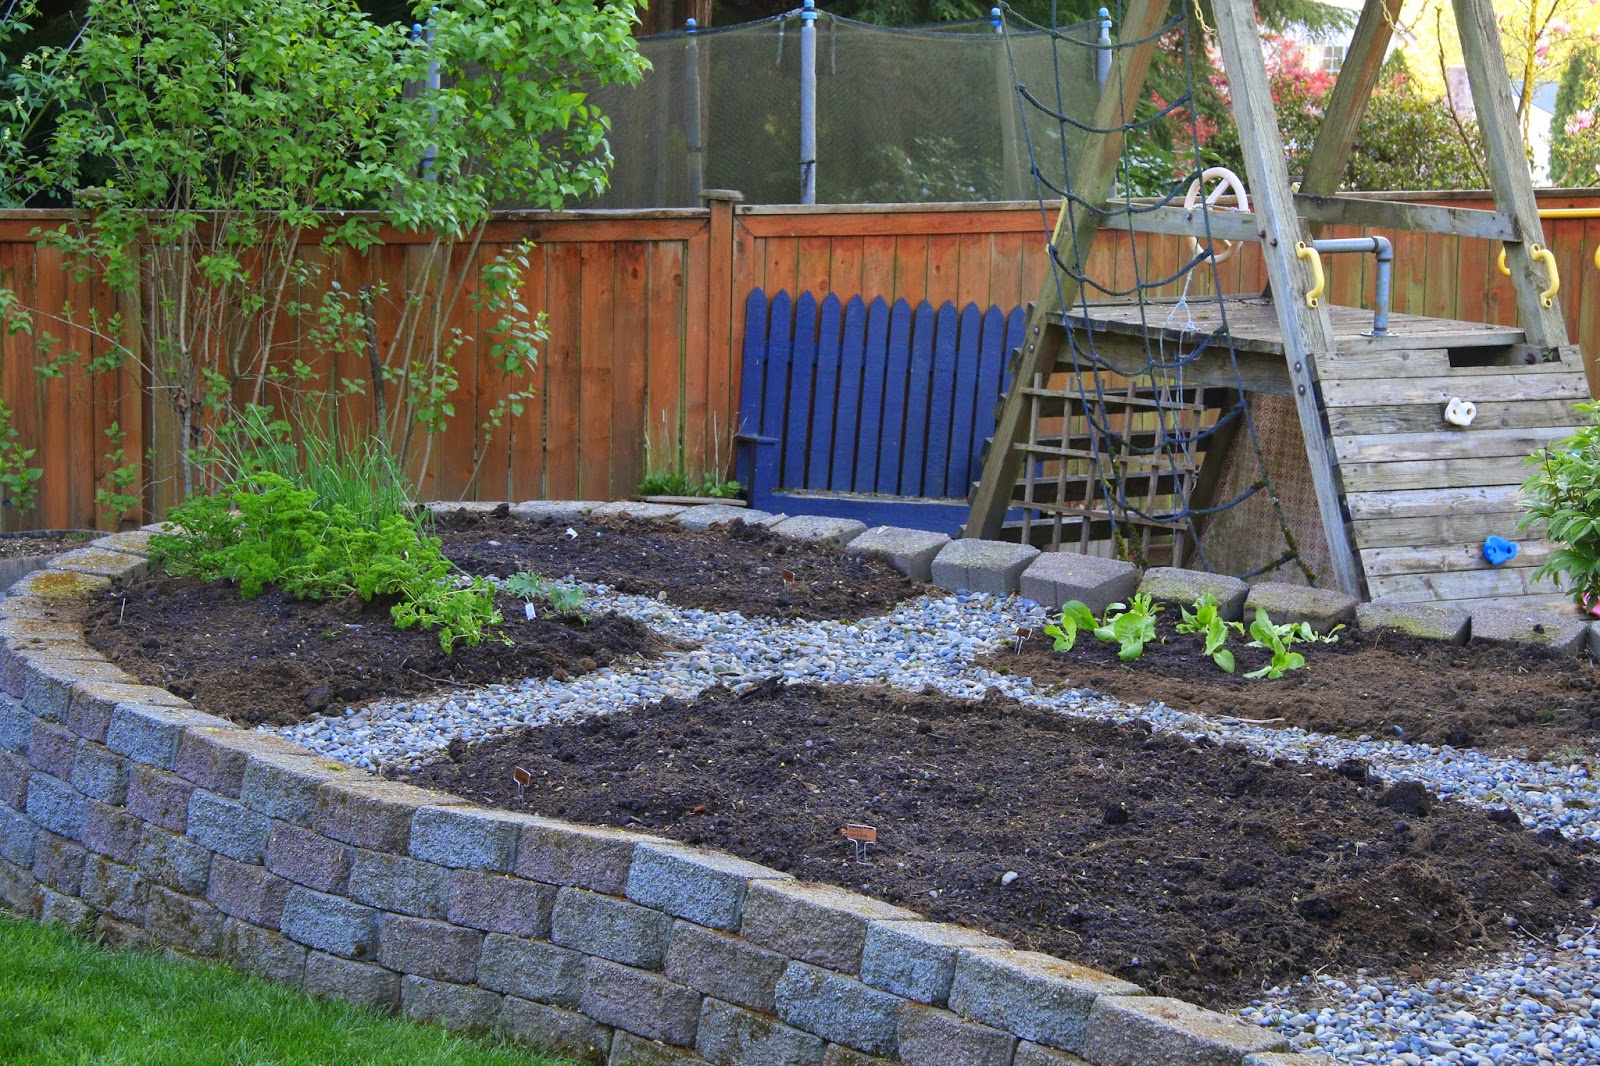
The seeds and starts have been planted in our little garden and my attention is turning to how we use our outdoor space.  My daughter is 10 now, and she has used the playset behind our garden, less and less over the past two years.
I always said that, when the kids outgrew the playset, we could get an above ground pool for this area.  It’s a nice flat spot that gets lots of sun!

The problem I’m having is that I just don’t see them using a pool.  We love swimming and go to the local pool several times a week in the summer, but my kids are spoiled.  The pools are really warm. (Side story:  When they were little I would hook up the hose to the hot water heater so we could have warm water in the blow up pool.) We live in the Pacific Northwest, and nights are not warm.  The pool water in an unheated pool is pretty chilly!  I truly think that if we put a pool in this spot, I would go unused.

My mind has been wandering toward the idea of Outdoor Learning in my classroom lately.  I’m kind of obsessed with Reggio Emilia and Reggio Inspired learning spaces.  You can read more about my Reggio obsession on my literacy blog.  I’ve been reading about wonderful outdoor spaces that simply invite kids into nature, and it made me start to wonder if I could create something inspiring out here.
Can’t you image a little arbor or bridge inviting a 10 year old and her friends into a mini outdoor school to play?

I’m picturing a few Adirondak chairs, tree stumps for side tables, maybe a table made from a tree round, a chalk board on the fence, and balance beams made from logs.  Little outdoor lights, hanging from the fence would complete the space.  The little kids (the 10 year olds) might use it to play school, or games on the chalkboard, while the big kids (the 14 year old crowd) could use it as a hang out that’s a little further away from mom and dad on a summer night.  Maybe I’m dreaming, but I think this could be a really cool space!
I’ve created a Pinterest board with ideas for my outdoor learning space.  Some of the ideas are more suited to a school environment, but there are lots of ideas that could be used in the backyard as well.  

I can see using lots of natural materials, which might keep cost down.  Now, I just need to find a neighbor who is cutting down a tree and doesn’t need the wood.
Happy outdoor space planning!

Share this:

  • Click to share on Facebook (Opens in new window)
  • Click to share on Twitter (Opens in new window)
  • Click to share on Pinterest (Opens in new window)

Filed Under: Garden, Kids, Miscellaneous, Outdoor Tagged With: Outdoor Spaces

How To Keep Your Kids Busy Over Spring Break

April 1, 2015   By Becca Leave a Comment

Spring break is almost here!  We are sticking pretty close to home this year and it made me think about what we are going to do to keep ourselves busy.  This blog is all about home and family.  I love to share cooking, sewing, gardening, and art projects that we are doing around here so I thought I’d let you in on my secret weapon.  I must confess that I don’t always come up with amazing ideas on my own to keep my daughter busy.  I love books and I’m always on the lookout for fun How-To books for her.  Over the past few years, these have provided hours of entertainment.
*In full disclosure, I’m part of the Amazon Affiliate program, so if you choose to buy a product by clicking on it, I get a little kick-back.  I promise, I wouldn’t tell you to buy these books unless I really and truly loved them.*
First up is the Mom and Me Cookbook.  I have a pretty big children’s cookbook collection and this one is my absolute favorite.  
If you’re up for a little sewing, this book has some great projects for beginners.  My daughter and niece made both of the projects on the front of the book, had a great time, and learned a new skill.
 
 
If gardening is your thing, then this next book is great for getting a few little projects going.


The next item is something that I don’t actually own, but it is on my wish list.  I’ve been wanting to do some experimenting with wire art in the classroom and at home.  I thought this would be a good way to start and see how we like it.


I bought this pipe cleaner book when we were on vacation and needed an activity for our down-time.  It was a great way to keep kids busy.  Did you know the best way to cut pipe cleaners is with nail clippers?  The book comes with pipe cleaners and shows you how to make all sorts of different animals.


Ok, this one is awesome.  Have you ever heard of watercolor pencils?  You color with them, like normal pencils, but then you add water to the colored-on paper with a paintbrush.  It makes it look like a watercolor painting!  You might be thinking, “Ok, that’s great, but I can’t draw.”  Well, neither can I!  This book walks you through the drawing process, step by step, and you end up with a pretty cool product.  My daughter liked this one and even framed a few of her paintings.


My last suggestion is the Loopdedoo.  It’s a little “machine” that helps you make friendship bracelets out of embroidery floss.  Each bracelet takes just minutes and there are tons of different looks you can make.  This was a Christmas present one year and it kept my daughter busy for the entire break.

I can’t wait for Spring Break.  Sigh.  Arts and crafts, gardening, sewing, and baking are on my To Do list.  Doesn’t that sound lovely?

Happy shopping!

Share this:

  • Click to share on Facebook (Opens in new window)
  • Click to share on Twitter (Opens in new window)
  • Click to share on Pinterest (Opens in new window)

Filed Under: Baking, Cooking, Garden, Kids, Miscellaneous Tagged With: Amazon Affiliate, Art, family, products

Kid Sized Apple Pies

November 20, 2014   By Becca Leave a Comment

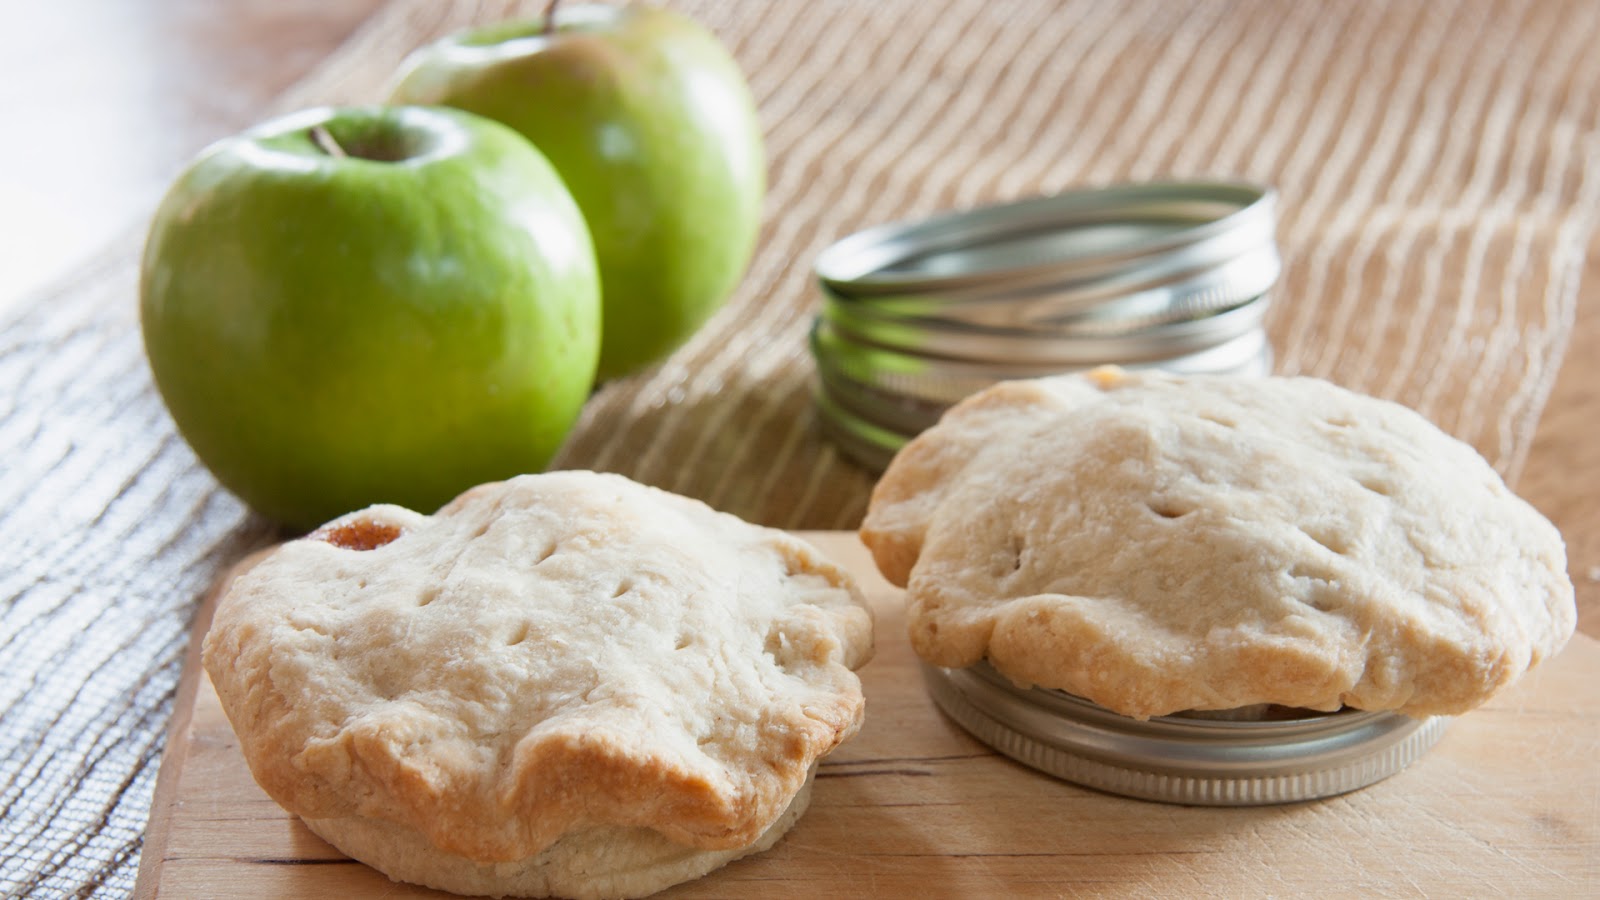
My Kid Sized Apple Pies are now posted on LeapFrog’s Learning Path!  Talk about SUPER cute and yummy!  I really loved making these with the kids.  We used our apple corer, peeler, slicer which makes any  apple activity fun.  I’m in charge of a couple of pies on Thanksgiving, and I’m thinking my daughter might have to make these to bring to the party.

If you’re interested in the recipe and how to use canning rings to bake them up, click over to LeapFrog’s Learning Path.

Share this:

  • Click to share on Facebook (Opens in new window)
  • Click to share on Twitter (Opens in new window)
  • Click to share on Pinterest (Opens in new window)

Filed Under: Baking, Kids, Miscellaneous

Vintage Modern Floral Quilt

March 9, 2014   By Becca 1 Comment

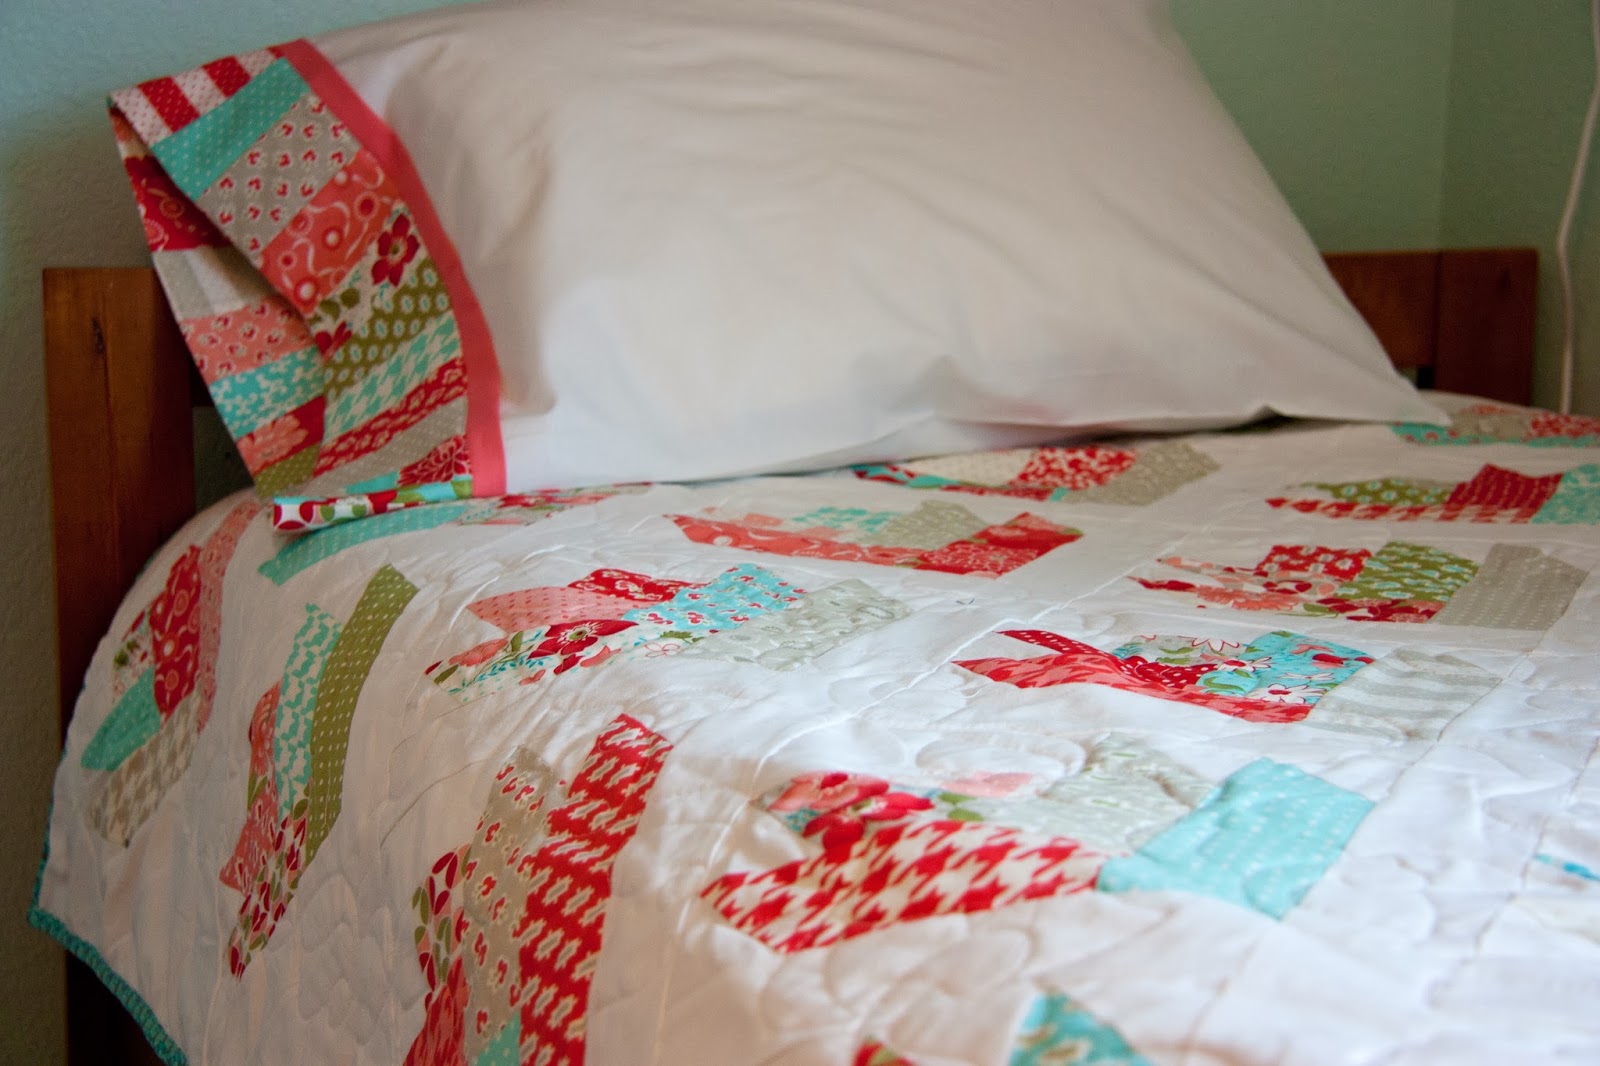
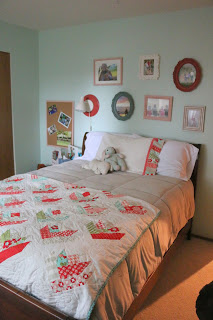
The quilting is finally done on my daughter’s new quilt!  I picked it up from my longarm quilt lady this weekend.  This quilt has been a long time in the making.  My daughter picked out the jellyroll about 2 years ago now.  I finished the top over the summer, and took it to my quilt lady in the fall.  I told her I was in no hurry, knowing that Christmas was coming, so I think it really got pushed onto the back burner. Meanwhile, I made the cute pillowcase with a few of the scraps from the quilt.
I’m thrilled with the way it turned out.  My daughter wanted floral quilting.  She even drew out the type of floral she wanted.  It was the first thing she noticed when I showed her. She said, “Wow! She even used my flower design!”
I love the way it turned out, and more importantly, my daughter loves it!
Happy quilting!

Share this:

  • Click to share on Facebook (Opens in new window)
  • Click to share on Twitter (Opens in new window)
  • Click to share on Pinterest (Opens in new window)

Filed Under: Kids, Miscellaneous Tagged With: Bedrooms, quilts

Hitting the Slopes

February 15, 2014   By Becca Leave a Comment

In the olden days, before kids, I absolutely LOVED to ski.  I spent my Saturdays on the ski bus and went skiing with my dad, brother, sister, friends, or anyone who I could get a ride to the mountains with.  The kids came along, and suddenly there was no such thing as free time. Fourteen years later, here we are.  My skis have been in the rafters of my garage and I have lost all confidence that I can even handle the bunny hills.  My son has really been wanting to learn, so yesterday we decided to take him up to the mountains.
 
We signed the kids up for the cheapest package they had.  It included 2 hours of a group lesson, ski equipment rental, and a lift ticket.  My son was really excited and my daughter was a bit apprehensive, which kind of surprised me because she’s such a dare devil.

 
I brought my skis along because I figured I’d have the rental place look at them and see if they were even in working condition. (I’m talking about those skis my son is holding in the picture above.) I carried them into the rental place and immediately someone spotted them and said, “Man, those are antiques!” My hubby and I couldn’t stop laughing. Pieces of my boots had actually disintegrated over the years and there was no way I was going to ski down any hill with them.
 
I knew it was going to take some work to convince my husband to try anything but when I suggested we take a snowboard lesson together, while the kids were in their lesson, he agreed! He has never been on skis or a snowboard before, so this was big.  I can’t say I was too keen on the idea of taking the fall on your butt class snowboard class, but I was so excited that he agreed to give it a try.

 
Let me just say, snowboarding is absolutely not a sport we are going to be continuing with.  First of all, the whole unbuckling your boot thing is a pain in the neck!  Second of all, every time I fell I felt like the little boy in A Christmas Story who was so bundled up that when he fell in the snow he couldn’t get back up.  Yes, I just created a perfect visual for you… me, rolling around in the snow, with that stupid snowboard attached to my boots, yelling, “I can’t get up.  I can’t get up.”
 
My hubby did much better, even though the instructor kept yelling, “Dude, you need to keep your toes up Bro.  You’re an accident waiting to happen.”  He mastered the bunny hill like nobody’s business!

 
It was kind of fun because we were on the same little hill that my kids were taking lessons on, so I could take lots of pictures.

 
My kids loved their lesson and the instructor was great with kids.  I can’t tell you how relieved I was that they were enjoying it.  Learning to ski is not cheap, and I was worried that they would be freezing and just hate it. 

 
Here’s a picture of my hubby and my daughter coming down at the same time. 

 
I didn’t get too many pictures of my son.  I think he needs brighter clothes so I can find him easier.  He blends in with everyone else. 

 
Both kids picked it up very quickly and by the end of the 2 hours the instructor told us they were ready for the chair lift.  As fast as I could say, “I can’t get up!” I traded in my snowboard for skis. 
 
See the blue coat I’m wearing below?  Well, apparently that is in the same antique class as my skis.  They told me to put my pass in my upper left pocket, but I didn’t have an upper left pocket.  The guy who was helping me looked all over my coat and said, “Man, that’s old school!”  I reminded him that I was the same 40 year old mom who brought in the antique skis and we both busted up laughing.  When he started joking with me to just hang onto everything because they’d eventually come back in style, I told him to watch out because I was going to find myself some stirrup ski pants and Vuarnet sunglasses.  Oh yeah. 
 
 
To finish up the skiing story, once I popped my skis on, it was like 14 years had never passed.  The only difference was that now I was worried about taking care than more than just myself.  I was watching my kids ski for the first time, worried that they’d be scared on the lift, cheering them on, and reminding them to slow down!  Wow, what a difference 14 years can make.  We took a few runs on Daisy and both kids loved it.  I could have kept going, but by the time they turned the lights on, the kids were ready to call it a day.  My daughter said, “This is the longest I’ve ever gone without eating.”  She’s kind of a snacker, so her comment was pretty funny. 
 
We got in the car and the kids immediately started telling us about their lessons, fears, joys, and accomplishments.  They were so excited.  They weren’t tired at all.  They ate everything in sight and were talking a mile a minute.  I guess that’s a sign that it was a good day.
 
Valentine’s Dinner was KFC on the way home and the kids immediately started asking when we could go skiing again.
 
Good times.
 
Happy memory making, Friends!
 

Share this:

  • Click to share on Facebook (Opens in new window)
  • Click to share on Twitter (Opens in new window)
  • Click to share on Pinterest (Opens in new window)

Filed Under: Kids, Miscellaneous Tagged With: family, Family Memories, Valentine's Day

13

February 4, 2014   By Becca Leave a Comment

Thirteen Years.
Enough Said.

Share this:

  • Click to share on Facebook (Opens in new window)
  • Click to share on Twitter (Opens in new window)
  • Click to share on Pinterest (Opens in new window)

Filed Under: Kids, Miscellaneous

My Playful Living Room

January 30, 2014   By Becca Leave a Comment

Yesterday I shared two of my favorite Playful Learning classes.  Playful Learning Spaces was the first eCourse I took from Mariah.  I signed up for this class a few years ago and fell in love. The Playful Learning style is exactly what I want in my home, the homes of my students, and in my classroom.  I have shared the books and eCourses with countless parents in my classroom over the years.

Today, I’d like to share a space in my own home that has become a family favorite.  Welcome to our living room.
When my kids were really little, I thought of this as a formal space.  I had really beautiful lamps and over priced pillows with really pretty tassels.  Guess what… no one ever went into the formal room!  They knew I’d freak out if they used my pillows in their forts.  There were no games or puzzles in this room, and really nothing to do except sit.  In my brain, I was planning how I could add a bonus room above my garage because the kids needed a place to play.  Then one day, it came to me.  I had plenty of space in my house. We just didn’t use it.  Long story short – I sold the fancy stuff on Craigslist, bought some fabric to make pillows and curtains, and hit Target for lamps, cheap decor, and an ottoman to throw our feet up on.  
Just like that, we had our bonus room.
I moved all of the board games and magazines into this room too.  Yes, we even broke down and bought a tv, so it could be a video game space when my son had friends over.  
Then, Mariah came along.
One of her Playful Learning eCourse lessons was about looking around your house to find unused nooks, and make way for playful learning.  At the time, my son kept all of his guitars, stands, music, and amps up in his room.  I decided that if they were downstairs, where we all live and play, he’d use them more.  As a result, he does in fact play more.  I play more often too.  Just yesterday I grabbed a guitar, flipped to Amazing Grace, and played just for fun.  My daughter even ran down and picked up a guitar to join me.  It was only 3 simple chords and 10 minutes of time, but it was something we did together.  More importantly, it was something that we wouldn’t have done together if the guitars had been hiding upstairs.
Why, yes, there is even a microphone in this space!  Call us crazy! 
If you have kids, you know exactly which songs we are hearing belted out these days.  
Let it go. Let it go. Can’t hold it back any mooo-ooore.  Yep, that microphone plugs right into the guitar amp and there is some serious Frozen going on!  My daughter has also been taking piano lessons and we had just enough space to fit a small keyboard.  It’s not fancy, but it does the trick.  

I’d have to say that creating this Playful Space for music has added some noise, but it’s a joyful noise.
Happy music making!

Share this:

  • Click to share on Facebook (Opens in new window)
  • Click to share on Twitter (Opens in new window)
  • Click to share on Pinterest (Opens in new window)

Filed Under: Kids, Miscellaneous Tagged With: E-Courses, Family Memories, Living Room, Playful Learning

  • 1
  • 2
  • 3
  • …
  • 5
  • Next Page »

Welcome

Hello, Friends. I'm Becca. I'm a teacher, and when I'm not in the classroom, I'm doing everything I can to create a happy home. I love to cook, bake, garden, sew, quilt, teach, and simply spend time with my family. I don't consider myself to be an artist, but I strive to find the art in the everyday things I do to make our house a home. Join me as I quilt you up some comfort or warm you with some cookies!

Connect

youtubegoogleplusinstagrampinteresttwitterfacebooketsyemail tpt icon for blog

Search This Blog

Archives

Categories

  • Baking
  • Cooking
  • Decorating
  • Embroidery
  • Garden
  • hobbies
  • Home and Family Friday
  • Kids
  • Miscellaneous
  • Organization
  • Outdoor
  • Parties
  • Photography
  • Quilting
  • Sewing

My Family

Autumn/Winter 2011 Idea Book

Stamp of the Month

Shop With Me!

About Me

Hello, Friends. I'm Becca. I'm a teacher, and when I'm not in the classroom, I'm doing everything I can to create a happy home. I love to cook, bake, garden, sew, quilt, teach, and simply spend time with my family. I don't consider myself to be an artist, but I strive to find the art in the everyday things I do to make our house a home. Join me as I quilt you up some comfort or warm you with some cookies!

Copyright © 2023 · Migrate with Fabulous Blogging · Log in