home is where my story begins...

  • Home
  • Baking
  • Sewing
  • Cooking
  • Decorating
  • Garden
  • Featured On
  • Contact Me

Mission: Organization

March 29, 2015   By Becca 1 Comment

Do you have those spaces in your home where you feel like the contents are spilling out to greet you?  Does something fall on your foot every single time you open the darn freezer?  Do you have piles of Barbie movies that your daughter hasn’t watched for at least 3 years?

You don’t?  Wellll, I don’t eeeeither… I guess.  Just forget everything I just wrote there.

In all honesty, my house is in desperate need of decrapification.  Decrapification needs to precede cute-sification, so I can’t make my house pretty until I can see a few of the surfaces again!  The problem?  We just have too much junk!  Our weekends have been crazy-busy with basketball tournaments and I just haven’t had time to clean out the clutter.  There are certain hot-spots in my house right now that are driving me insane, so I’ve decided to take the next few weeks and write about Mission: Organization on the blog.  (It sounds much nicer that Mission: Decrapification.)  Spring Break is just around the corner and we don’t have any huge trips planned, so we’ll have a little time to get things organized around here.  (My kids are going to be thrilled with this plan… Hey kids, instead of hitting the beach on Maui today, we’ll be reorganizing the sock drawers!!!)

Today we started with hot-spot #1, my little hoarder’s room.  She was actually in the mood to get rid of things, so I jumped at the chance.  She’s decided that her room is too small.  Well, her room is a nice size, she just has too many toys and no place to walk.  She decided that it was time to get rid of the Barbies and store the American Girl Dolls and clothes under her bed.

Will you look at this?  I can see the floor! And the bed is made!  And the books are put away!

She cleared out all of the Barbies, houses, planes, and RV’s.  We also took a huge box filled with school projects and garbage out to the recycle bin.

Now, doesn’t this look like a place you could have some fun?
There is space to play, space to work, and space to WALK!
Happy decrapification organizing!

Share this:

  • Click to share on Facebook (Opens in new window)
  • Click to share on Twitter (Opens in new window)
  • Click to share on Pinterest (Opens in new window)
  • Click to share on Google+ (Opens in new window)

Filed Under: Miscellaneous, Organization Tagged With: Bedrooms, clearing out the clutter, family

My New Barn Door

July 19, 2014   By Becca 3 Comments

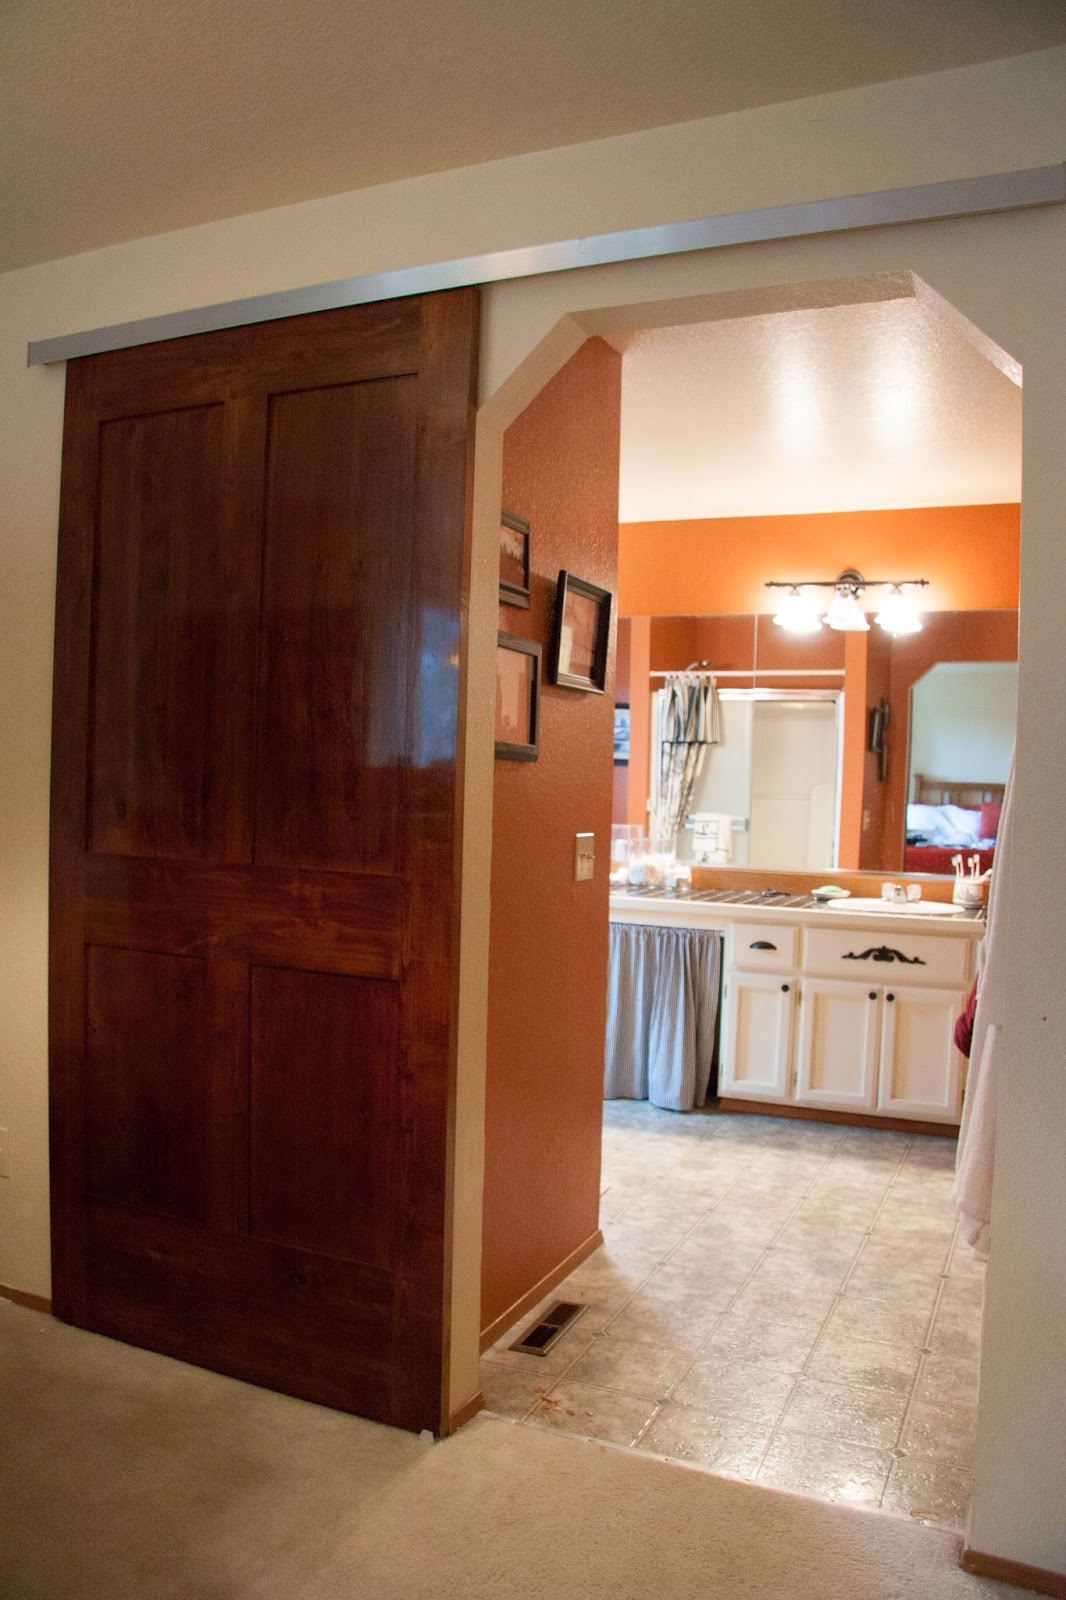
I have a door!  I HAVE A DOOR!  Do you hear angels singing?  I do! I’ve lived in this house for TEN YEARS WITH NO DOOR!  I don’t know who designed this house, but why would you not put a door on a bathroom?  It doesn’t even have a door to a separate toilet area – just NO door at all until NOW!  
Here’s the before shot.  You can imagine how this must light up the room, when someone gets up in the middle of the night or gets up early for work.  It was an extra wide opening, so we had to special order a door that would fit.
Because of the shape, you couldn’t really just add a door frame without cutting the wall and evening out those corners.  Even if you cut the corners and ordered a frame and door, it would still all need to be custom because of the size.  Custom = $$$.

I don’t care anymore.  I have a door!  
We went up to The Door Store in Marysville with our measurements and my PInterest board filled with barn doors.  They said, “Oh, sure.  We can totally do that for you.  The door will be about $1,500 and the track is about $500.”  Then I mentioned that I want the cheaper version.  They showed me the cheaper version but it still wasn’t in out budget, so I forced them to get a little creative.  They said they could do a special order door, that wouldn’t be a true barn door, but would at least have a couple of panels.  They found an unfinished door for me, so I could finish it myself and save a little more money.  The unfinished 4 panel door cost us $350, which was a much better price for this project.  It’s solid and heavy, which is what I wanted.  
I was a little disappointed in the finish on the door.  We have been stripping, staining, and varathaning all of the doors, cabinets, and trim in the house.  It’s been a long project and we are only about half way done.  When I was staining the doors (we bought a new door to the garage too) I ran out of Varathane.  I took a picture of what I wanted and sent my hubby to Lowe’s to pick up a new can.  Well, either I took a picture of the wrong can or he bought the wrong thing.  (I’ll go with me taking the wrong picture since he’s always nice enough to run out and pick up anything I need for my hairbrained projects.)  Well, the lighting in the garage isn’t very good and I didn’t even notice how shiny the doors were turning out until I had them hung up.  They are shiny.  Really shiny.  I must have had my hubby buy semi-gloss instead of satin.  Grrrrr.  It really, really, really bothers me when I look at them, but I have no desire to take the doors back down and go through the whole process of refinishing.  So, the doors will stay.
The hardware was another area we had to get creative to cut costs.  The barndoor hardware I really wanted was about $450.  A bathroom door in my master bedroom, that no one will ever see (except my blog reading friends) is not the place I want to spend $450.  So, I asked my Door Store friends if they had any other bright ideas.  They sent us over to the economical version of a track for a sliding door.  This one was only $80.  Perfect!  My first thought was just to spray paint it black and call it done, but then I thought that a burlap valance might be a nice way to hide the track.  My neighbor also suggested a barnwood cornice.  I do have a few pieces of barnwood in my garage, so that may be an option.  For now, I will just be happy to have a door!  I have a door, friends!!

Yep, angels singing.  

I think I’ll go down to my local Farm and Garden Feed Center to see if they have any barn door handles.  
It’s a happy day!

Share this:

  • Click to share on Facebook (Opens in new window)
  • Click to share on Twitter (Opens in new window)
  • Click to share on Pinterest (Opens in new window)
  • Click to share on Google+ (Opens in new window)

Filed Under: Decorating, Miscellaneous Tagged With: Barn Door, Bathroom, Bedrooms

Vintage Modern Floral Quilt

March 9, 2014   By Becca 1 Comment

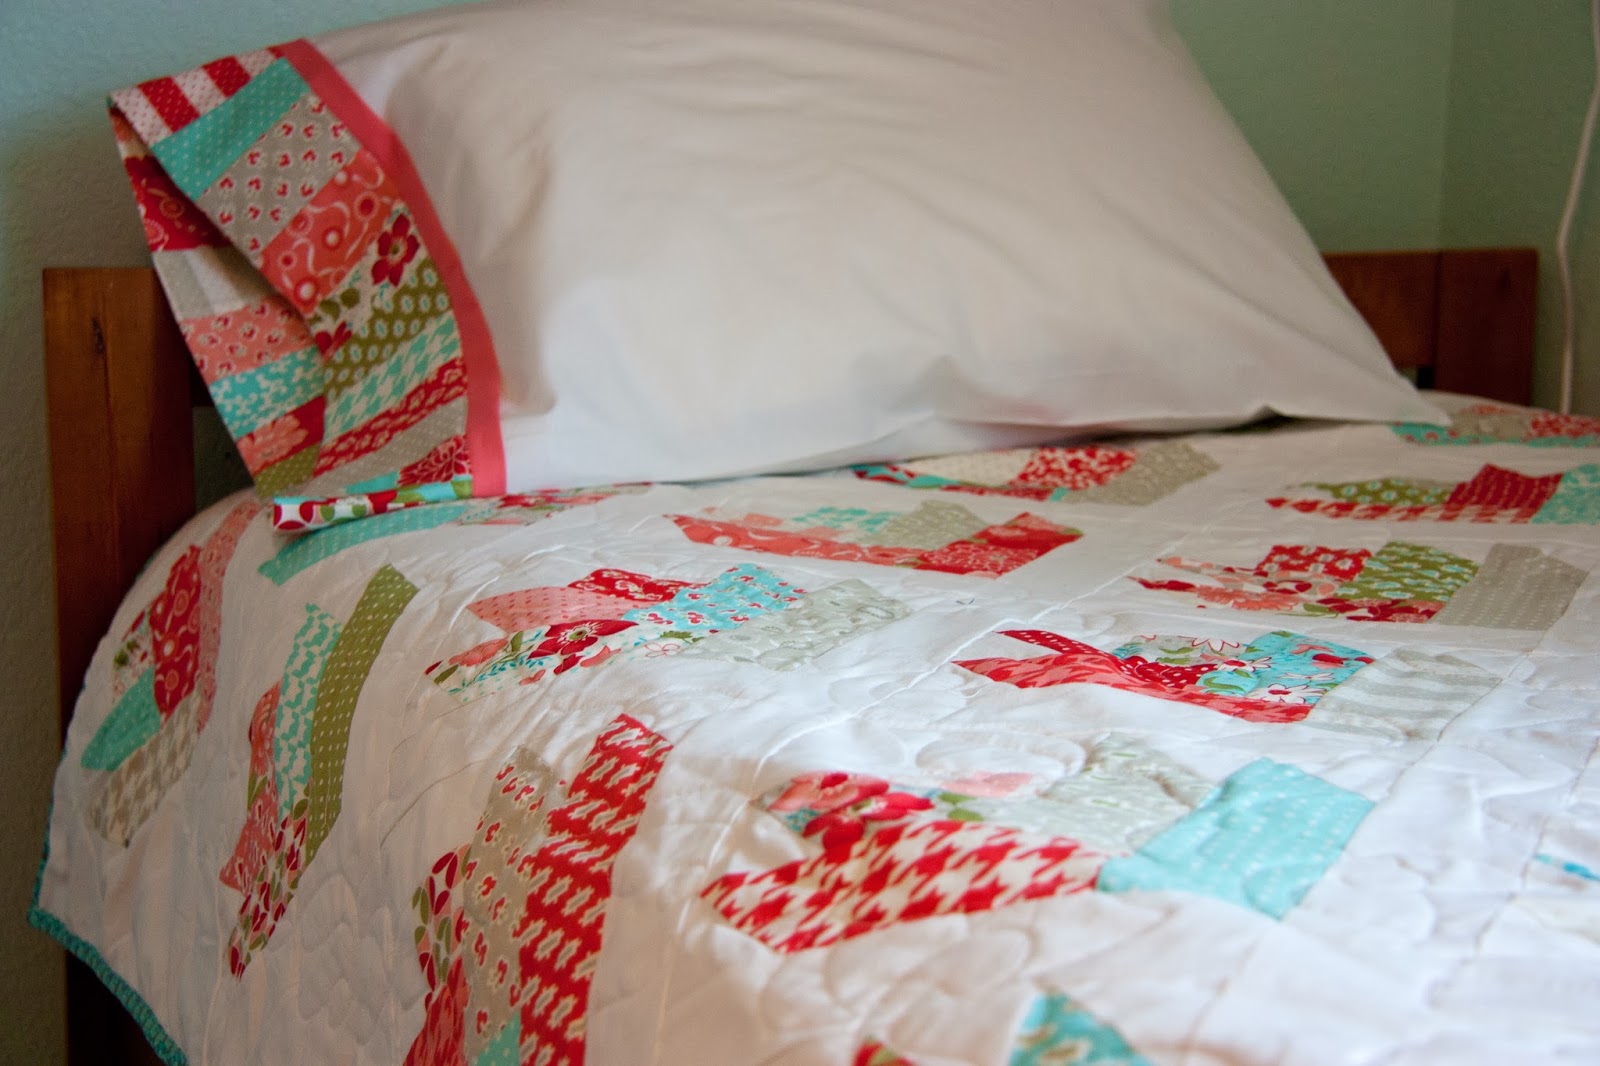
The quilting is finally done on my daughter’s new quilt!  I picked it up from my longarm quilt lady this weekend.  This quilt has been a long time in the making.  My daughter picked out the jellyroll about 2 years ago now.  I finished the top over the summer, and took it to my quilt lady in the fall.  I told her I was in no hurry, knowing that Christmas was coming, so I think it really got pushed onto the back burner. Meanwhile, I made the cute pillowcase with a few of the scraps from the quilt.
I’m thrilled with the way it turned out.  My daughter wanted floral quilting.  She even drew out the type of floral she wanted.  It was the first thing she noticed when I showed her. She said, “Wow! She even used my flower design!”
I love the way it turned out, and more importantly, my daughter loves it!
Happy quilting!

Share this:

  • Click to share on Facebook (Opens in new window)
  • Click to share on Twitter (Opens in new window)
  • Click to share on Pinterest (Opens in new window)
  • Click to share on Google+ (Opens in new window)

Filed Under: Kids, Miscellaneous Tagged With: Bedrooms, quilts

Kids’ Desk, Writing Center, and Bulletin Board

January 5, 2014   By Becca Leave a Comment

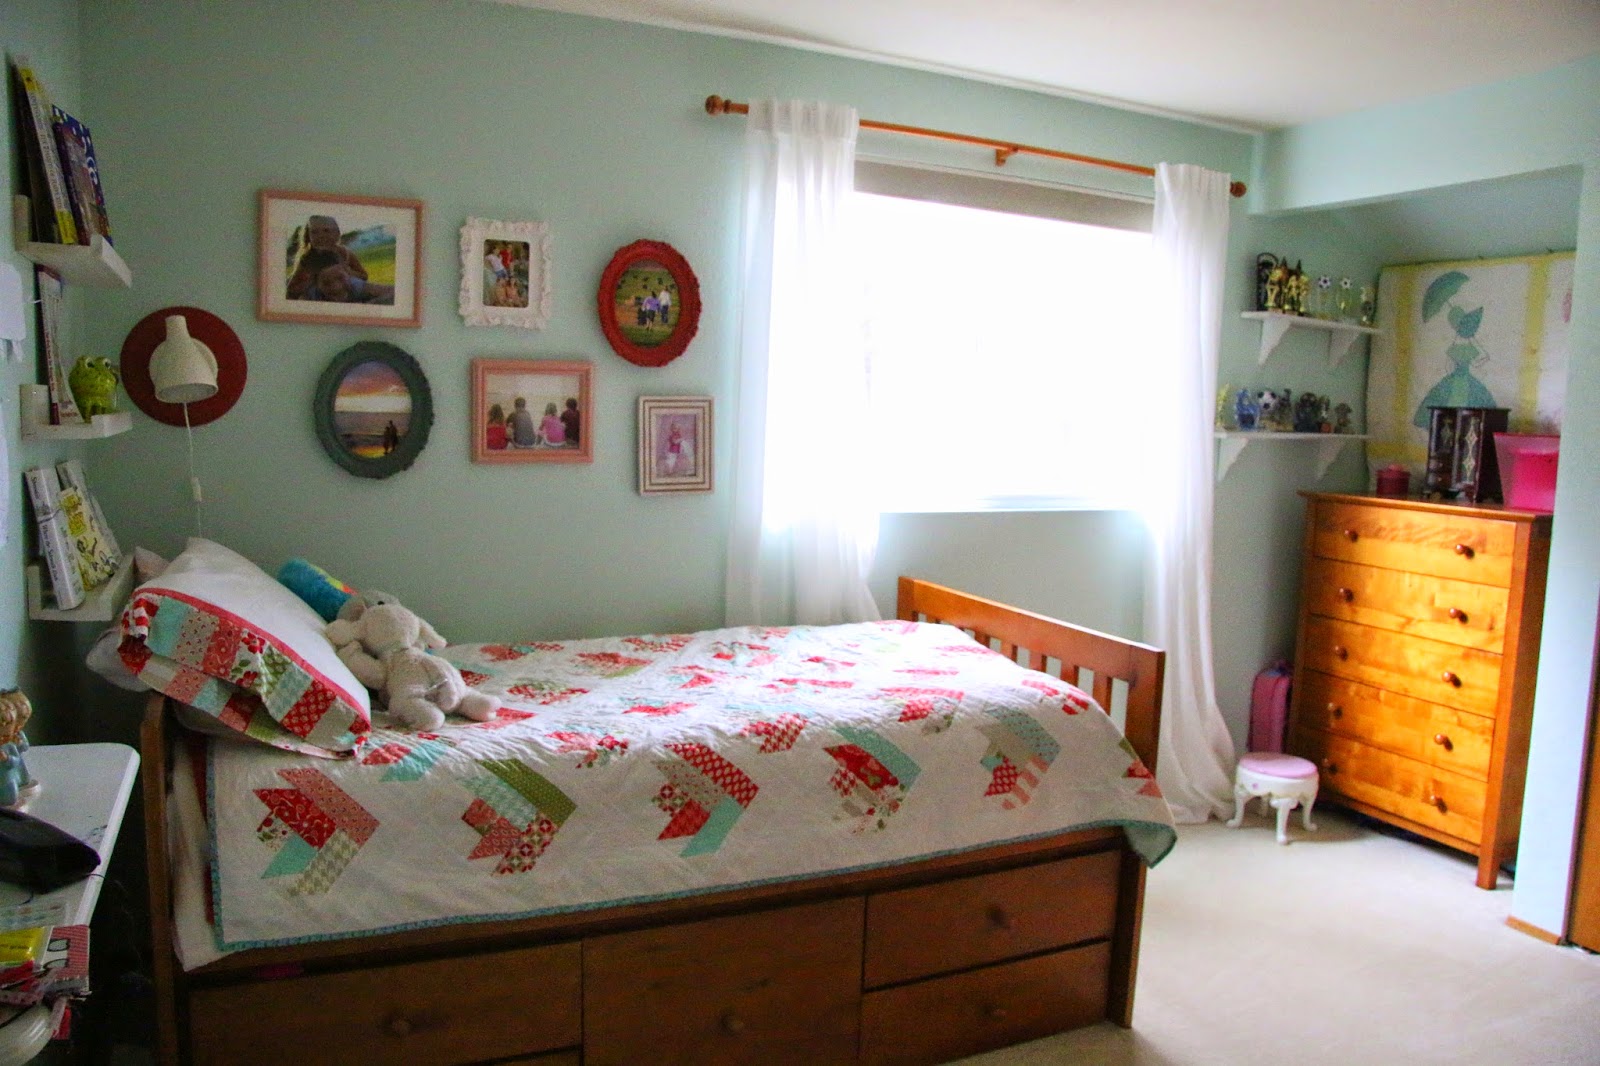
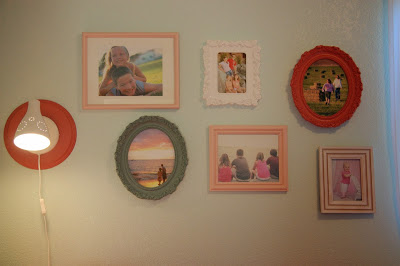
Yesterday I shared the cute little gallery wall in my daughter’s room.  Here’s the other area we’re finished with.  This is her desk area, which she uses as a writing center and art area.  (She does her homework downstairs, so this is more of an arts and crafts area.)

We had an old bulletin board sitting around, so we painted it with one of our sample paint colors.


Then, we printed out a few pictures with some friends.


 The furniture used to be in my son’s room.  So, the desk is new to my daughter, by not new.  I painted the peg board writing center that used to be downstairs.  This is the perfect spot to keep writing supplies on hand.  I loved having this in the kitchen because it encouraged writing every single day.  My hubby got tired of running into it and politely asked if it could go somewhere else.  He lets me do just about any hairbrained idea I have in our house, so when he says something bugs him, I try change it for him.  He puts up with a lot of crazy ideas.  It’s the least I can do.

With a few projects down, we only have a few left to go!  Happy painting!

Share this:

  • Click to share on Facebook (Opens in new window)
  • Click to share on Twitter (Opens in new window)
  • Click to share on Pinterest (Opens in new window)
  • Click to share on Google+ (Opens in new window)

Filed Under: Decorating, Kids, Miscellaneous Tagged With: Bedrooms, paint

Gallery Wall With Painted Frames

January 4, 2014   By Becca Leave a Comment

I still haven’t posted pictures of my daughter’s finished room because… well… the room isn’t exactly finished yet.  The curtains are still hanging in puddles on the floor, waiting to be hemmed and embellished.  The quilt is still at my long arm quilt lady’s house, being finished, and I haven’t even started on pillows or cute pillow cases.

I did finish up the gallery wall with some cute painted frames though!

I used frames I had around the house and painted them with colors that coordinate with my daughter’s quilt. I purchased four different colors of sample sized paints from Lowe’s.  I knew we’d be doing a few projects in this room and paint seemed like a cheap and easy way to go.  

I started pinning several different arrangements for gallery walls.  My original idea was to include an old window or some sort of subway art, but this seemed like plenty. I had planned to let my daughter choose all of the pictures for the frames, but she was a bit overwhelmed when I started scrolling through options on the computer with her.  So, I just picked photos I like instead.  She was happy with the finished wall, even though there wasn’t a lot of ownership into the selection.

This wall is above the long part of my daughter’s bed, so I thought a reading lamp was a good idea.  I found this one for about $12 at IKEA and my friend, Diane, picked up the wood block that the lamp is mounted on from Michael’s.  I love that redish-pink color and wanted to add one more little accent with it on this wall.


Old picture frames and several paint colors make a pretty cool gallery wall, if I do say so myself!

I can’t wait to show you the finished room!  Maybe I’ll get everything done by Spring Break! Now, I need to find more things to paint with those cute sample size paints!

Happy painting!

Share this:

  • Click to share on Facebook (Opens in new window)
  • Click to share on Twitter (Opens in new window)
  • Click to share on Pinterest (Opens in new window)
  • Click to share on Google+ (Opens in new window)

Filed Under: Decorating, Miscellaneous Tagged With: Bedrooms, family, paint

Thank You IKEA

October 3, 2013   By Becca Leave a Comment


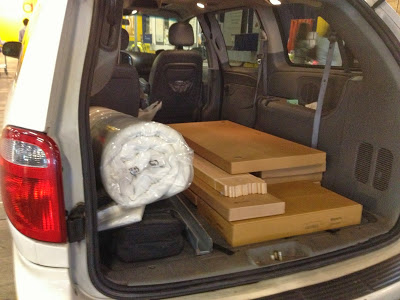
I mentioned earlier this week about our redecorating project.  It all started with a conversation my hubby and I had over lunch one Saturday.  I told him that I needed help figuring out our daughter’s room.  Nothing about the room was working.  She needs more storage. (Have you seen the show Hoarders?)  She really likes to collect things, but doesn’t really like to part with them. Ever. We had her bed on risers so we could store dolls and stuffies under her bed, but the risers aren’t very stable and the bed keeps tipping.  When it tips, it bumps into the heater which freaks me out.  Her dresser is quite large and her room is quite small, and her closet is a whole ‘nother story. I was a little surprised by his response.  He suggested than maybe the 12-year-old-as-tall-as-his-mother may need to have something other than the little-boy-captains bed.  He suggested moving the furniture from our son’s room to our daughter’s and then eventually getting a new dresser and bed for our son.  So, I asked both of the kids what they would think and they were thrilled!

Guess how we spent the rest of the afternoon?

You guessed it!  I was all about getting that furniture rearranged.  It made so much sense and I wanted it done now, now, now!  Oh, and I forgot to mention that neither of the kids were home, which makes cleaning out their rooms a heck of a lot easier! (Have you ever seen the way the people on Hoarders cry when they have to part with their treasures?)  Yep, it had to be done and it had to be done before they got home!

My daughter’s room was the easy part. We took the old furniture downstairs, which will be painted and sold as soon as I get my act together.  Then we moved the “new” furniture into her bedroom.
 So. Much. Storage.
I love that I don’t have to worry about the bed anymore too.

That left a new problem for my son though.  He wasn’t too thrilled that he had nothing left in his room except a bunch of boxes filled with his clothes.  We started looking on the IKEA website because I knew they had prices we could afford.  Sunday afternoon we took a LONG drive down to IKEA. (Ok, it’s only an hour away, but it feels like forever.  It was a nice naptime for me though.)  We picked out the pieces we wanted, wrote down the numbers, and went back to pick them up.

Not one single piece was in stock.  My son’s attitude went from elation to devastation in about 10 seconds flat.  The pieces were supposed to be back in stock on the following Thursday, so on Friday I took a trip down again.  This time I couldn’t nap because I had to drive.  Meanwhile, my mom was painting my daughter’s room.  (Redecorating has been a team effort.)

Now, onto the part where I tell you how much I love IKEA!
I was very grumpy because everything was out of stock the first time.  When I walked in, there was a nice man who was just waiting to help me find my pieces.  He loaded them right onto the cart for me and I took them straight to the checkout.  He even pushed the cart for me!  I don’t know if I just looked pathetic and helpless or if he just didn’t have anything better to do on a Friday morning, but it worked for me!  After the nice lady rung me up, she called someone else to help load everything in my car!  I never asked for help and she didn’t even ask if I wanted help.

Another nice IKEA man told me to bring my car around and he’d load it all in!  It was actually my sister in law’s van that I had to borrow twice because I had to drive down there twice. (Remember how I said this was a team effort? Yep. Nice to have family to help.)  So, I was home by noon with my son’s new bedroom set and I never even had to touch a box.  Gotta love IKEA!


My hubby spent a few hours on Friday night building the bed and a few more hours building the dresser and nightstand on Saturday.  I’m pretty sure I had the easiest part of our team effort redecorating weekend.  Don’t worry, I’ll make up for it when I clean out our little hoarder’s closet. That’s going to be a full time job!

Happy redecorating!

Posted by Picasa

Share this:

  • Click to share on Facebook (Opens in new window)
  • Click to share on Twitter (Opens in new window)
  • Click to share on Pinterest (Opens in new window)
  • Click to share on Google+ (Opens in new window)

Filed Under: Miscellaneous Tagged With: Bedrooms

Storing Books

February 28, 2011   By Becca 2 Comments

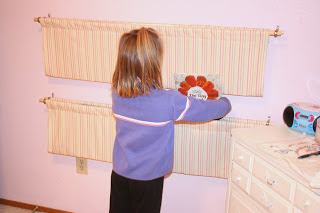
The new book slings are filled with books!


I’ve mentioned that I’m taking a class on creating playful spaces. Just as we were discussing reading nooks, my kids decided their rooms needed a change. They both decided to rearrange their furniture to create reading nooks. I swear, I did not even mention it to them. They came up with the idea all on their own.

After rearranging, my daughter decided she wanted to keep some books in her room. We have a central kids’ library, upstairs in a little corner of the master bedroom. I was happy that she wanted a space to keep some of her favorite books, but there was no room for a bookshelf.

In reading about playful spaces, I came across this idea for a book sling.

This book sling is from Family Fun.

LOVE IT! I knew I had leftover fabric, from recovering the dress-up box. My daughter and I went to work, creating her book slings. I did the cutting and she helped me with the sewing.

We started by cutting two rectangles for each sling.  I cut one from the pretty fabric and one from cheap muslin.  The Family Fun website suggests sizes for cutting, but I didn’t want to buy new fabric, so I used what I had.  We sewed right sides of the fabric together and then turned the fabric right sides out.  This made nice edges on the fabric.


We folded the edges over and sewed a little pocket for the dowels to slide through.

Then we took a trip to Lowe’s for the rest of the supplies. We bought double curtain rod brackets. (The cheapest we could find.) We also bought 5/8th inch wooden dowels, in 4 foot lengths.

This was one of the easiest projects we’ve done in a long time.

I think I’ll probably shorten the slings a little.  My daughter has short little books and they just fall to the bottom of the sling. 

Now my son wants a book sling too!  I don’t think we’ll be using the pink stripes in his room though.

Happy reading!

Share this:

  • Click to share on Facebook (Opens in new window)
  • Click to share on Twitter (Opens in new window)
  • Click to share on Pinterest (Opens in new window)
  • Click to share on Google+ (Opens in new window)

Filed Under: Decorating, Kids, Miscellaneous, Organization, Sewing Tagged With: Bedrooms, early childhood, favorite projects

Organized Bliss – A Five Year Old’s Bedroom

May 3, 2010   By Becca 13 Comments

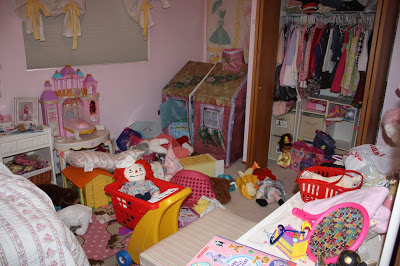
Last Thursday my daughter and I went through EVERY SINGLE toy, article of clothing, stuffed animal, and hair clip that was in her room. She helped me pick out things that needed to go to charity and find homes for things she was done playing with. Thursday night she went to bed in a perfectly organized room. I looked around her room and said, “There.”

The next day she and her little friend played in her room…. and this is what it looked like by the evening.

OH. MY. GOSH.

Sometimes I wonder how she can possibly be my daughter. She can make a mess unlike anything I have ever seen before. No matter what new system of organization we come up with, she manages to make a disaster. I know all the rules:
*get the kids involved in organizing
*ownership helps them take pride in their space
*teach kids how to clean and put away, don’t just do it for them
I’m a teacher. This is what I do.

So, Saturday morning we were at it again. We put everything back in the labeled bins.

She told me that the reason it was so messy was because they wanted to play in the playhouse when it was empty. So, they had to take all of the toys out of the playhouse. I convinced her to close up the Barbie house to free up a little more floor space. Then we moved the stuffies out of the playhouse.

The pink bins, holding stuffies and babies, are from Storables. The Barbie house is all folded up for now. The low shelf holds the Build-A-Bear stuffies. She loves to take them down and play with them so we wanted the shelf to low enough for her to reach. Usually they all have different outfits when she puts them back on the shelf. Right now most of outfits, accessories, and shoes are in the Build-A-Bear cubby.

My daughter’s room is back to organized bliss.

I’m sure, in no time at all, it’ll be back to this:

Check out these linky parties.
http://betweennapsontheporch.blogspot.com/2010/05/impromptu-tea-partymad-hatter-style.html?utm_source=feedburner&utm_medium=feed&utm_campaign=Feed%3A+BetweenNapsOnThePorch+%28BETWEEN+NAPS+ON+THE+PORCH%29&utm_content=Google+Reader

Share this:

  • Click to share on Facebook (Opens in new window)
  • Click to share on Twitter (Opens in new window)
  • Click to share on Pinterest (Opens in new window)
  • Click to share on Google+ (Opens in new window)

Filed Under: Miscellaneous Tagged With: Bedrooms

Welcome

Hello, Friends. I'm Becca. I'm a teacher, and when I'm not in the classroom, I'm doing everything I can to create a happy home. I love to cook, bake, garden, sew, quilt, teach, and simply spend time with my family. I don't consider myself to be an artist, but I strive to find the art in the everyday things I do to make our house a home. Join me as I quilt you up some comfort or warm you with some cookies!

Connect

youtubegoogleplusinstagrampinteresttwitterfacebooketsyemail tpt icon for blog

Search This Blog

Archives

Categories

  • Baking
  • Cooking
  • Decorating
  • Garden
  • hobbies
  • Home and Family Friday
  • Kids
  • Miscellaneous
  • Organization
  • Outdoor
  • Parties
  • Photography
  • Sewing

My Family

Copyright © 2021 · Migrate with Fabulous Blogging · Log in