home is where my story begins...

  • Home
  • Quilting and Sewing
  • Baking
  • Cooking
  • Decorating
  • Garden
  • Featured On
  • Contact Me

Chicken with Creamy Basil Sundried-Tomato Sauce

June 21, 2016   By Becca Leave a Comment

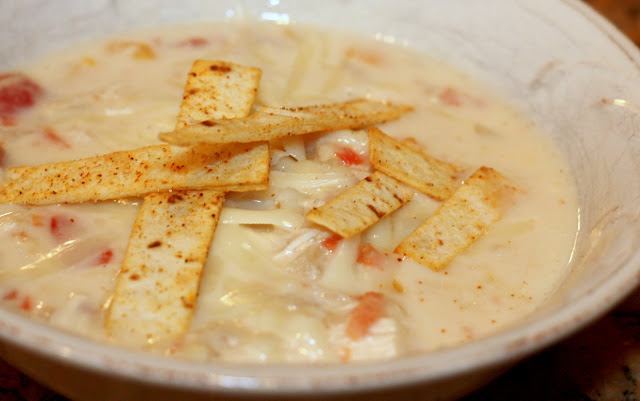
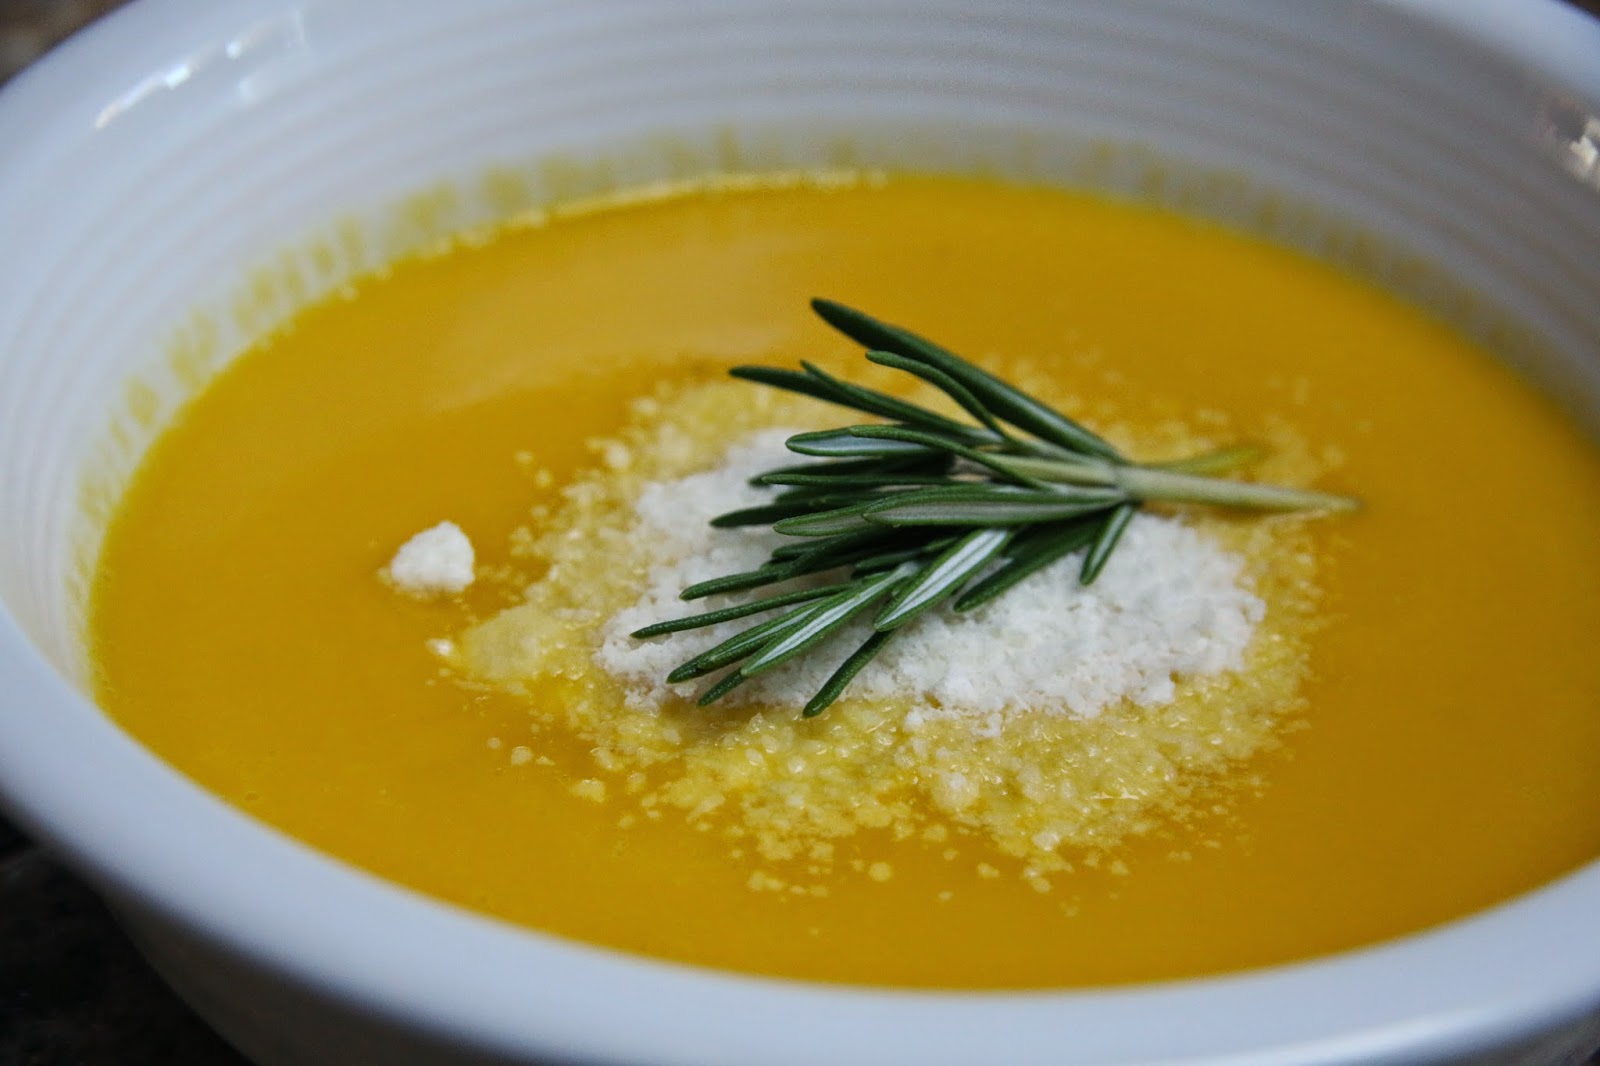
I saw a yummy looking recipe floating around on Facebook recently and wanted to give it a try.  Like most of my cooking, I didn’t stick to the recipe and changed things up a bit to put my own twist on it.

chicken basil and sundried tomato pasta

My kids said they like my thick and creamy Alfredo sauce better, but my hubby liked this recipe because it was lighter than an Alfredo, but still had a bit of creamy texture to it.  This was one of my favorite recipes I’ve made in a long time.  I’m a big fan of basil and sundried tomatoes, and love using ingredients from my garden, so this one made me happy.


Chicken with Creamy Basil Sundried-Tomato Sauce
Print Recipe
A light creamy sauce, fresh basil, and sundried tomatoes gives this sauce a Tuscan flair. Serve over noodles for a complete meal.
  • CuisineItalian
Servings Prep Time
4-6 people 10 minutes
Cook Time
20 minutes
Servings Prep Time
4-6 people 10 minutes
Cook Time
20 minutes
Ingredients
  • 2 lbs chicken breast thinly sliced
  • 2 Tbsp olive oil extra virgin
  • 1 1/2 cup heavy cream
  • 1 cup chicken broth
  • 1/2 tsp garlic powder
  • 1/2 tsp Italian seasoning
  • 1/4 cup chopped spinach fresh, not frozen
  • 1/4 cup chopped basil
  • 1/2 cup sundried tomatoes thinly sliced
  • 3/4 cup Parmesan cheese grated
Servings: people
Instructions
  1. In a large skillet, heat olive oil and cook the chicken until brown on each side and no pink in the middle. Remove the chicken to a plate.
  2. Add heavy cream, chicken broth, garlic powder, Italian seasoning, and Parmesan cheese. Stir and heat until it starts to thicken.
  3. Add the spinach, basil, and sundried tomatoes. Then, add the chicken back to the pan.
  4. Serve over pasta.
Recipe Notes

Share this Recipe

Share this:

  • Click to share on Facebook (Opens in new window)
  • Click to share on Twitter (Opens in new window)
  • Click to share on Pinterest (Opens in new window)

Filed Under: Cooking Tagged With: cooking, recipes

Cub Scout Cake Bake Ideas

February 18, 2016   By Becca Leave a Comment

It’s been many years since my son was in Cub Scouts, but every year my son’s cub scout troop had a cake bake. It was a dad and son cake bake. No moms allowed. (Keep that in mind as you are scrolling down because they will make your jaw drop.) They auctioned off the cakes and the money went to the food bank. My hubby and son made the milk and cookie for Santa and we bought a really cute cake pan to make it happen.

There were so many cakes, and over the years, I just kept snapping pictures.

Can you believe this!!! Unreal.


Those little popcorn balls are actually cake pops.  So cute!

This cake won the Best of Live Auction.
I thought this cake was very clever!


This cake was amazing!  It even played cricket noises.
The construction cake included a remote controlled backhoe.  The kids had so much fun playing around with it before the auction!


Did I not tell you that these cakes are amazing?!?
Are you ready for the least appetizing cake of the bunch?
My son made Poop-Cakes In The Yard.
I’d say these Cub Scout Cake Bake cakes are pretty clever and extremely well done!
Happy baking!
Posted by Picasa


Share this:

  • Click to share on Facebook (Opens in new window)
  • Click to share on Twitter (Opens in new window)
  • Click to share on Pinterest (Opens in new window)

Filed Under: Baking, Miscellaneous Tagged With: baking, cakes, recipes

Hot Cocoa Station and Warm Quick Bread

December 5, 2015   By Becca 3 Comments

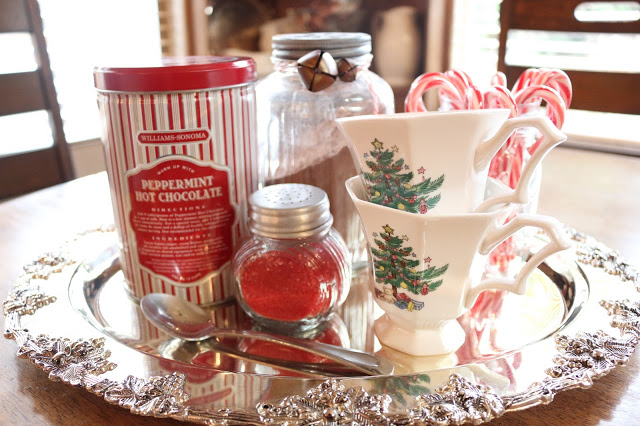
The hot cocoa station has taken its place in the kitchen.  I think this is one of my daughter’s favorite traditions about the Holidays.  She loves coming home after school and making herself a cup of cocoa.  My absolute favorite cocoa is Williams Sonoma Peppermint Hot Chocolate.  It’s to die for, friends.  It takes a little longer to make, so my kids tend to go for the Nestle Quick hot chocolate.  I pour that into a cute jar and it’s ready to go for an afternoon warm-me-up.
When you combine the hot cocoa station with some homemade banana bread or some warm pumpkin bread, it makes for some happy kids after school.


I must confess that the pumpkin bread is from a box.  I bought the Krusteaz Pumpkin Bread from Costco before my surgery because I didn’t think I’d be in the mood for baking.  We’ve all decided that we like this with butter and cinnamon sugar on top.
The banana bread is homemade.  I couldn’t resist baking when I saw that we had a few over-ripe bananas.  As much as I love making homemade bread with yeast, I also love a good quick and easy quick bread recipe.
Here’s the recipe I use for Banana Bread:
3/4 cup sugar
1/2 cup butter, softened
2 eggs
2 medium ripe bananas (mashed)
1/3 cup milk
1 tsp vanilla
2 cups flour
1 tsp baking soda
1/2 tsp salt
Preheat oven to 350 degrees.
Grease the bottom of a bread pan.
Beat sugar and butter until light and fluffy.
Add bananas, milk, eggs, and vanilla. Mix.
Add the rest of the dry ingredients. Mix.
Add 2 cups of chocolate chips (optional).
Bake at 350 degrees for 50-60 minutes.
Happy Baking!


Share this:

  • Click to share on Facebook (Opens in new window)
  • Click to share on Twitter (Opens in new window)
  • Click to share on Pinterest (Opens in new window)

Filed Under: Baking Tagged With: bread, recipes

It’s Almost Baking Time – My Favorite Easy Spritz Cookie Recipe

November 15, 2015   By Becca 2 Comments

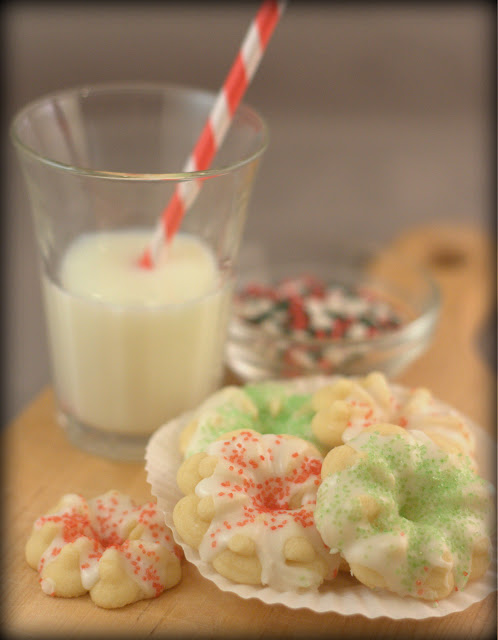
Here they are…

the first Christmas cookies of the season at our house!

Recipe for Spritz Cookies

1 cup butter (room temperature)
1 1/4 cup powdered sugar
2 egg yolks
1 1/2 tsp vanilla
2 1/2 cups flour
1/2 tsp salt

Mix butter and powdered sugar.  Add egg yolks and vanilla.  Mix in flour and salt.
Use a cookie press to shape cookie dough on a lined baking sheet. (I use a Silpat liner.)
Bake at 400 degrees for 6 minutes.
Frost with a powdered sugar and milk glaze.
Add sprinkles.
Let the Christmas baking begin!!!
This is my favorite cookie press. I’ve owned several cookie presses over the years and the Cuisinart Electric is the one I’ve had the best luck with.

I also highly suggest using a Silpat baking mat when you bake cookies. It makes the cookies just slide ride off the pan and have the perfect golden brown tint on the bottom.


Happy baking, Friends!

Dolen Diaries
Nap-Time Creations

Share this:

  • Click to share on Facebook (Opens in new window)
  • Click to share on Twitter (Opens in new window)
  • Click to share on Pinterest (Opens in new window)

Filed Under: Baking, Miscellaneous Tagged With: Christmas, Cookie Friday, products, recipes

Super Fast White Chicken Chili

October 27, 2015   By Becca Leave a Comment


I’m not sure why, but I’m noticing that I haven’t been cooking as much lately.  It’s not that I haven’t been feeding my family, because I have.  Our meals have been very rushed and crazy lately.  I’ve been throwing French Dips together or making a Panini out of the leftover lunch meat.  I haven’t actually been cooking over the stove or chopping vegetables for a new dish I’m trying out.  It could have something to do with the fact that my entire pantry collapsed and the contents are now sitting on my dining room table.  But, I’m chalking it up to just being really busy right now.

Last night I decided that I needed to make something really yummy.  My mom had made a bunch of chicken in the crock pot for me, while she was staying with my kids this weekend.  I used the chicken for tacos and had a lot of left over, so I decided that I’d make the white chicken chili that my family loves so much.  I wrote a blog post last year about the SUPER fast way to make this dish, so I thought I should repost the recipe.

Here’s what I did:

I started by cooking a pound of chicken breast in the crockpot.

In a pan, melt 2 tablespoons of butter.
Add 1/2 small diced onion, cook for 3 minutes
Add 1 clove of minced garlic, cook for 1 more minute
Add 1/2 cup flour and mix
Slowly add 1 cup of half and half and 1 cup of milk
Add 8 oz of light cream cheese
Add 1 1/2 cups of Monterey Jack Cheese, shredded
This mixture makes kind of a mac and cheese type sauce.
Slowly pour in 3-6 cups of chicken stock (depending on how thick you like your chili)
Add 1 can of diced tomatoes, drained and rinsed
(or chop your own)
2 cups of frozen corn
1 can of white beans, drained and rinsed
1/4 tsp chili powder or a little bit of taco seasoning
1 tsp salt
dash of pepper

It made a thick, yummy, cheesy, chicken chili that everyone loved.

My hubby says this recipe needs to go in our regular rotation. The kids both loved it too!  My son had a second bowl after we got home from the Young Life corn maze at 9:45pm.  This morning I found him heating another bowl and putting it into a thermos to take for lunch.  I guess that kid really loves this chili!!

By the way, those little tortilla strips on top were just cut and tossed with olive oil and a bit of taco seasoning.  Then I baked them for about 5 minutes to crisp them up.  They were a perfect little topping for the chili.

Happy cooking!

Nap-Time Creations
Dolen Diaries

Share this:

  • Click to share on Facebook (Opens in new window)
  • Click to share on Twitter (Opens in new window)
  • Click to share on Pinterest (Opens in new window)

Filed Under: Cooking, Miscellaneous Tagged With: recipes

Homemade Lemonade

July 21, 2015   By Becca 1 Comment

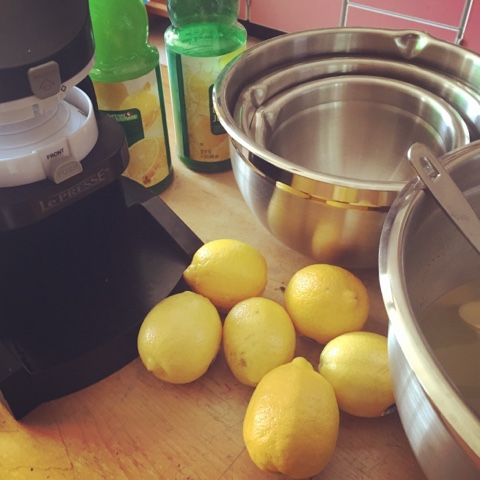
I’m not a huge fan of lemon, but my kids and hubby love lemonade.  During the school year, I did a cooking unit with my kindergartners and we made fresh squeezed lemonade.  (In all honesty, we squeezed some of the lemons and then used bottled lemon juice when we got tired of squeezing lemons.) Lemonade is really easy to make.  It’s just lemon juice, sugar, and water.  I thought it might be a good recipe to share with my bloggy friends, since the summer days are here and we might need a little cooling off!
Oh, how I love cooking in the classroom with my kids!  They were jumping with joy when they walked in the room and saw lemons and a lemon press.  Of course a few kids yelled, “What are we making Teacher?” (Yes, they still call me Teacher, even at the end of the school year.) I asked them what they thought we should do, and it didn’t take long for the suggestion of LEMONADE to come up!
I started by showing them an online book about lemonade that was on Reading Rainbow.  Our school has a subscription to the service, so I can’t share the link.  Then, we started squeezing lemons.  We needed 2 cups of lemon juice and all of our lemons made about 1/2 of a cup.  At that point I pulled out the bottled lemon juice and told them that we’d take the easy way out to come up with the rest of the juice.  (Although I think they would have squeezed lemons all day if I would have let them.)
Here is the recipe we used:
2 cups sugar
1 cup hot water
2 cups lemon juice
1 gallon cold water
Dissolve the sugar in hot water.  Add lemon juice and then cold water.  Stir.
We made our lemonade on a very hot and sunny (by Pacific Northwest Standards) day.  The kids were thrilled with the cold treat and really loved sharing with the recess teachers who are outside for most of the day.  
If you are interested in more lemon activities, here is a post I wrote for LeapFrog Learning Path with more ideas.  Lemony Learning Activities
It might be a good time to break out the lemonade stand and share some lemonade with the neighbors!
Happy lemon squeezing!

Share this:

  • Click to share on Facebook (Opens in new window)
  • Click to share on Twitter (Opens in new window)
  • Click to share on Pinterest (Opens in new window)

Filed Under: Miscellaneous Tagged With: LeapFrog, Learning Activities for Early Childhood, recipes, school

Growing Basil and A Pesto Recipe

July 19, 2015   By Becca Leave a Comment

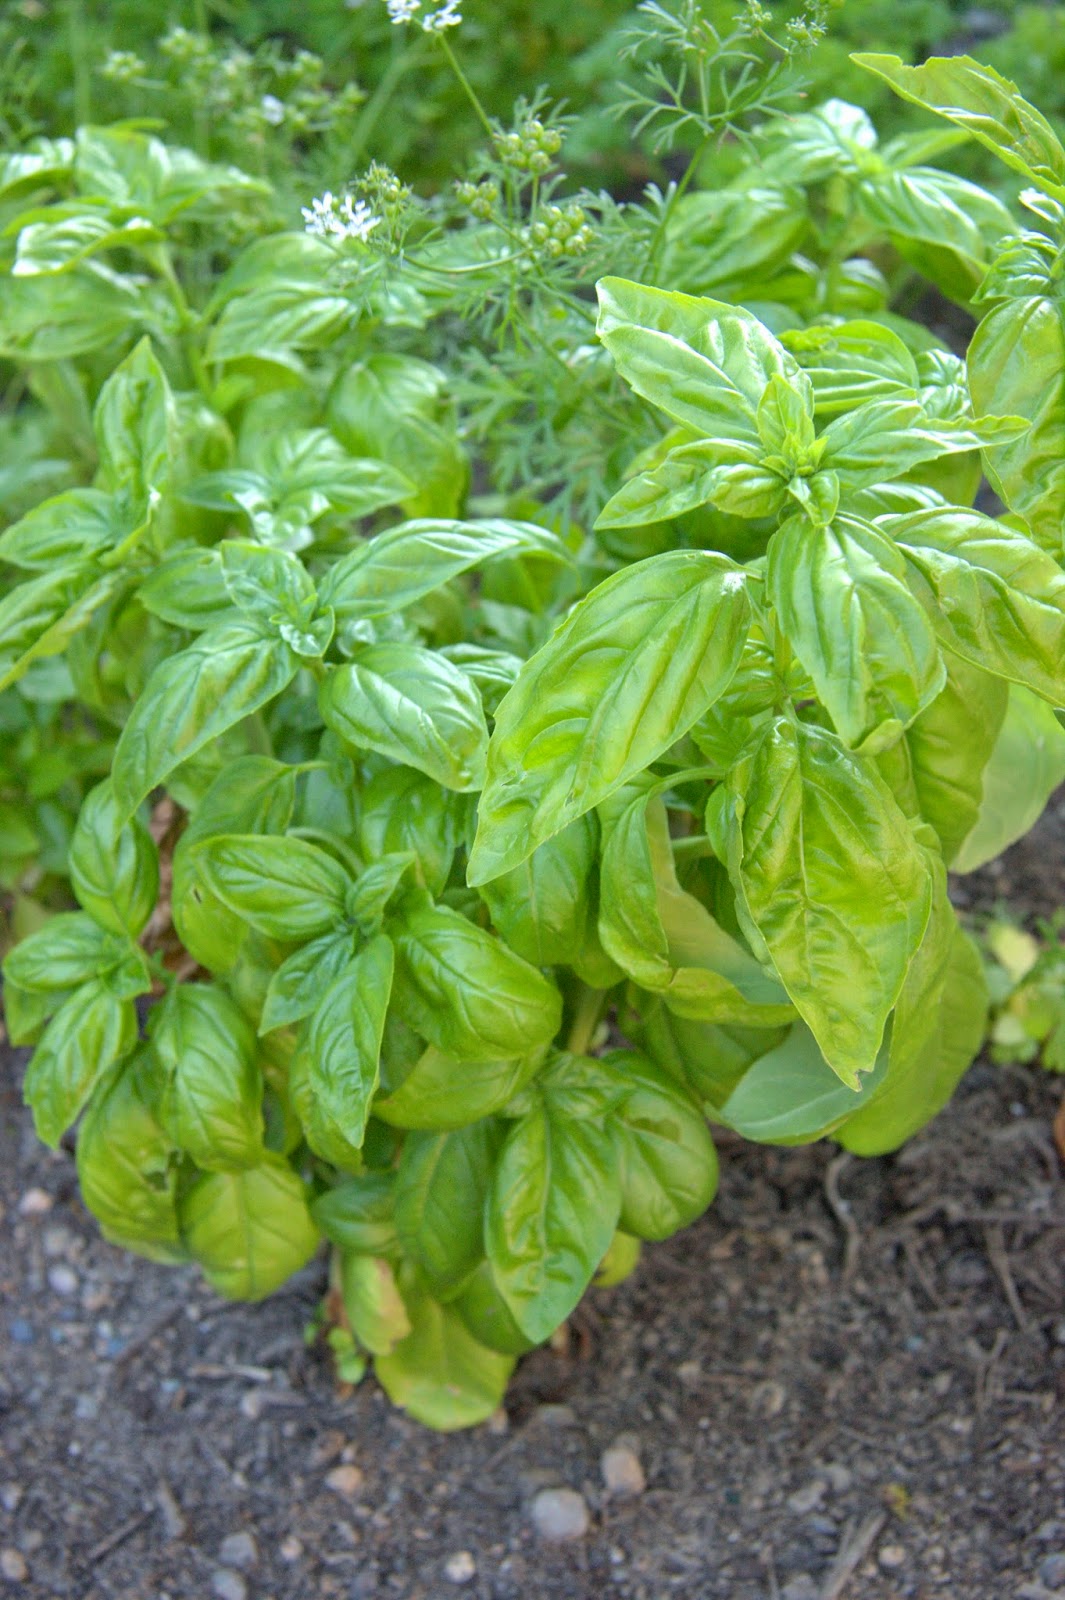
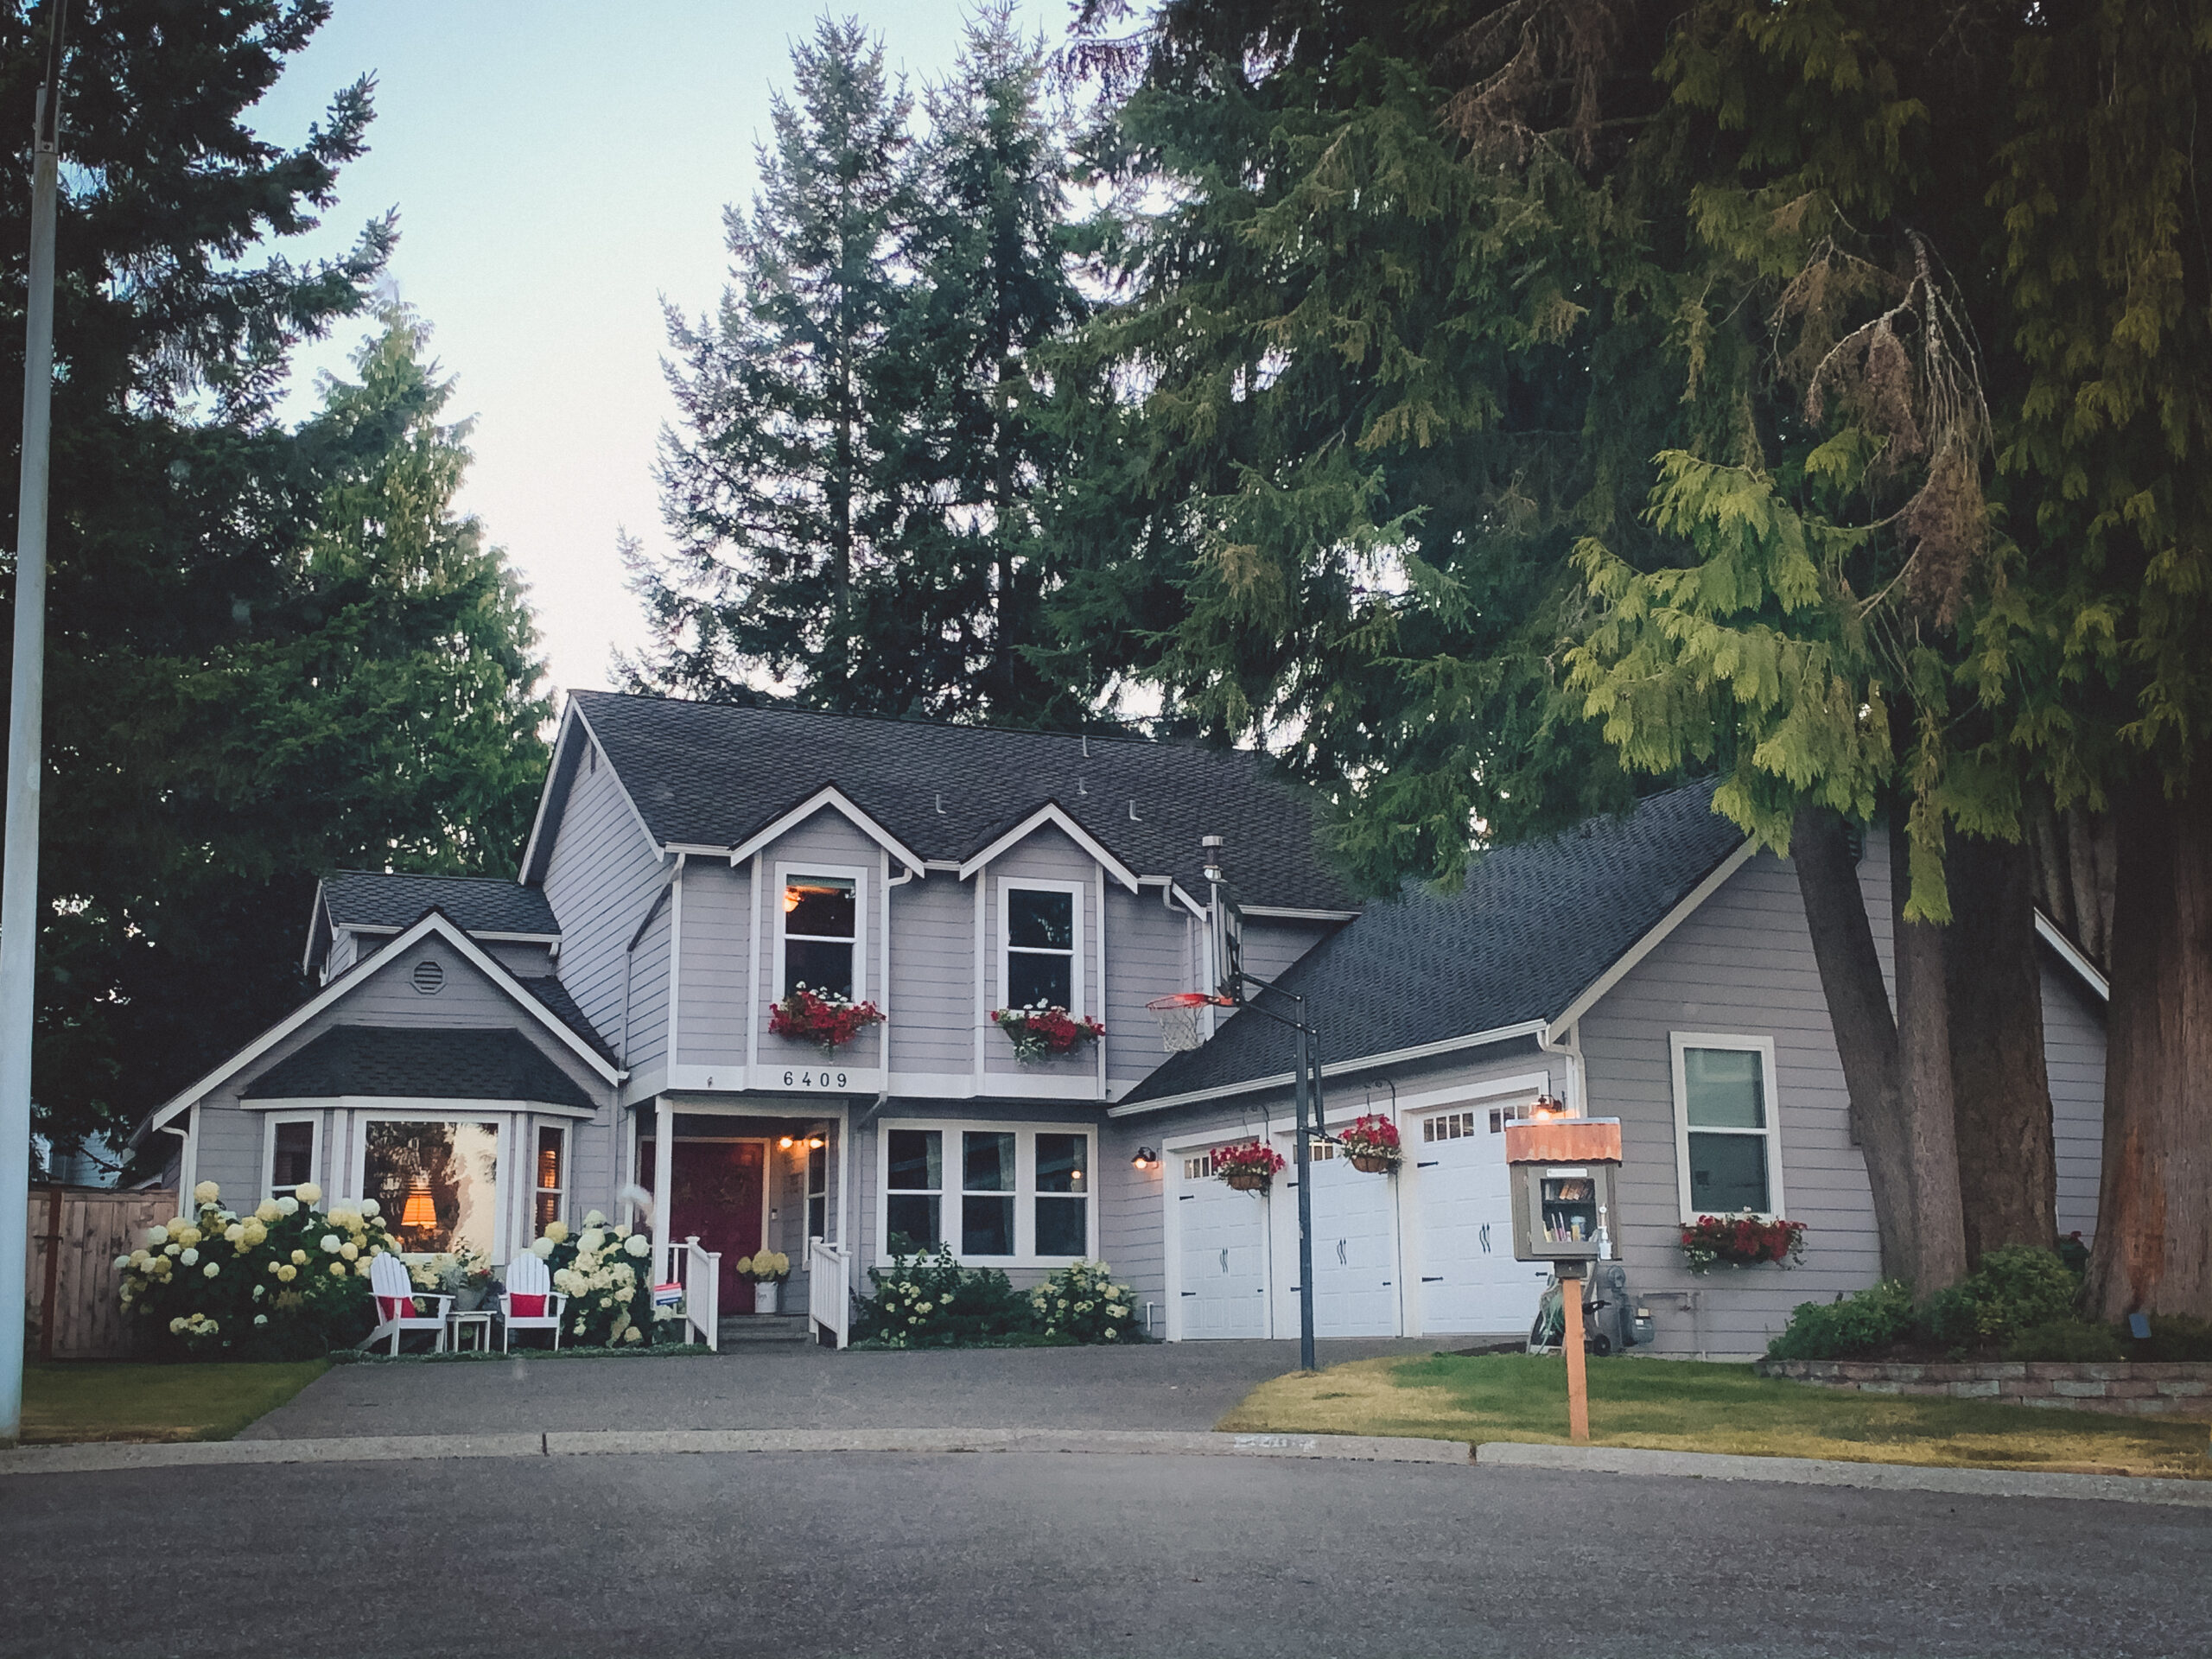
We have had the warmest and sunniest Spring and Summer that I can ever remember!  It has been a true gift, since I don’t have very many nice things to say about the Pacific Northwest during the rainy season (every month of the year except August).  Do you know which plant really, really, really loves hot and dry weather?
Basil!
Sometimes I plant my basil in May or June and it literally rots right in the ground.  It’s usually just too wet around here.  Since we had such a beautiful Spring, I decided to trust my luck and plant early again.  This time it paid off!
I have more basil than I know what to do with!  Ok, I’m actually having no problem using it… but you know what I mean.  Well, what do you do when your garden is overflowing with basil?
Make pesto, of course!
Last time I shared this recipe, it wasn’t actually a recipe.  I threw in a little of this and a little of that and chopped it all up in the food processor until it was ready.  This time I measured everything for you!  So, here’s what I did.
I put the following ingredients into the food processor:
2 cups packed basil
4 small cloves of garlic
3/4 cup of pine nuts
3/4 cup olive oil
1/2 cup grated Parmesan cheese
3/4 teaspoon natural sea salt
After a few second in the food processor, it’s all done!
The first night I served this over this spaghetti noodles, as a side dish.  The second night I made my favorite, EASY, pesto appetizer.

Making this appetizer is SUPER easy.  I mixed a little pesto with a block of cream cheese and spread it on a platter.  Then I topped it with more pesto and some chopped sundried tomatoes, and served it with crackers.  Sometimes I buy the bottle of sundried tomatoes that are packed in oil and other times I buy the package that is packed dry.  The oil packed tomatoes are a bit harder to work with and chop, but my kids seem to like these better.  I think the dry tomatoes look prettier because it doesn’t get oil all over your appetizer.  Either way, it’s very yummy.
One last tip about making pesto:
Pine nuts are very expensive and that doesn’t make me happy.  There is really no cheap substitute for pine nuts, so if you are making pesto, you just have to buy them.  That’s the reason pesto is so expensive to purchase in the grocery store.  I just discovered that Costco sells pine nuts!  I bought a big package for $20.  The package holds 4 3/4 cups of nuts, which is a steal compared to the $7 you will pay at the grocery store for a tiny little container.  I know I will be making pesto all Summer long, so it was worth it for me!

 Pesto is so fresh and yummy!  I just love it!  Once my daughter got over the muddy green color, she fell in love.  My son loves any type of food you put in front of him, so it wasn’t a hard sell for him. Me?  I love anything I can grow in my own garden, pick, and turn into dinner.  I can’t imagine anything better!
Happy gardening!

Dolen Diaries

Share this:

  • Click to share on Facebook (Opens in new window)
  • Click to share on Twitter (Opens in new window)
  • Click to share on Pinterest (Opens in new window)

Filed Under: Garden, Miscellaneous Tagged With: recipes

Roasted Butternut Squash Soup

February 15, 2015   By Becca 1 Comment

Never, in a million years, would I have thought I would like this soup.  Everything about it sounds horrible to me.  It’s made with squash, carrots, celery, and onions.  Blending those things together does not sound appetizing, but I’m here to tell you… It is amazing!!
I’ve been really trying to add more fruits and vegetables to my diet lately, and not just broccoli or green beans.  I’ve been trying to branch out and try things I normally would not eat.  We’ve learned to love sweet potatoes, avocados, spaghetti squash, and butternut squash.
I found a simple recipe online, but made several changes because I didn’t like the original too much.  Here’s what I did:
I started with a large package of chopped butternut squash.  It was about 4-5 cups.  I roasted it in a baking pan with a little olive oil for about 40 minutes.
In a blender, went:
4-5 cups roasted squash
1 stalk of celery
1 large carrot
2 slices of onion
3 cups chicken broth
I blended this for 8 minutes in a heavy duty blender. 
Next, I added salt and pepper to taste and a few tablespoons of butter.  I blended this up again.
If you have a fancy blender that heats, you’re done.  If not, the mixture can be heated on the stove.
Finally, I topped it with a few tablespoons of grated Parmesan cheese and sprig of rosemary.
Yum-O!  The texture kind of reminds me of a thick, cheesy soup, but without all of the guilt. It’s Heavenly.  
Happy blending!

Share this:

  • Click to share on Facebook (Opens in new window)
  • Click to share on Twitter (Opens in new window)
  • Click to share on Pinterest (Opens in new window)

Filed Under: Cooking, Miscellaneous Tagged With: blender recipes, health, recipes

Make Ahead Chicken Echiladas

October 12, 2014   By Becca 2 Comments

Being a “new” teacher is tough work!  I put new in quotes because this is my 19th year teaching, so I’m not really new.  I’m just new in the district, since moving to Snohomish this year.  I have had a lot of new teacher meetings to go to, which means I’m home later than I was last year.  There are many nights when my kids need to be fed and out the door by 5:30, so my after school meetings are making it tough to feed my family a decent meal.

Last weekend, I was very proud of myself!  I spent a little extra time making meals to put in the freezer.  I left a note on the counter for the kids to put the enchiladas in the oven at 4:00pm at 400 degrees.  By the time I got home from my meeting, dinner was ready!  Oh, how I love it when a good plan works out.

I usually start by putting a few chicken breasts in the crockpot with some taco seasoning (Yes, I buy the package even though I try not to buy prepackaged stuff.). I let that cook all day and by late afternoon, I’m ready to assemble the enchiladas. 

Combine 1 cup sour cream with one can of Cream of Chicken Soup.
Add a package of taco seasoning to the creamy mixture.

Lay out a tortilla shell.
Spread a little of the creamy mixture on the tortilla.
Add cheese and chicken.
Roll it up and put it in the (greased) pan.
Think of it like a taco and build it like that.
You can decide how much meat, cheese, and sour cream you usually like.

Once you’ve used all of the meat, lay the enchilada in the pan and smear (that’s a technical term) the rest of the creamy sauce over the top.  Top with cheese and bake for 30 minutes at 400.  The cook time will be longer if it is coming straight from the freezer.

I guarantee this is a family favorite in the making.

It’s Sunday again, so I’d better getting cooking for the week ahead!
Happy cooking!

Share this:

  • Click to share on Facebook (Opens in new window)
  • Click to share on Twitter (Opens in new window)
  • Click to share on Pinterest (Opens in new window)

Filed Under: Cooking, Miscellaneous Tagged With: crockpot love, planning ahead, recipes

A Teacher’s Secret to Surviving the Last Full Week of School

June 10, 2014   By Becca 2 Comments

We’re in the home stretch, Friends!  These last few days before Summer are filled with report cards, field trips, computer training, packing up the classroom, and still coming to school with undying energy and excitement.  Top that off with a handful of health problems, and it’s a recipe for one exhausted Mom at the end of the day.
Do you want to know my secret for staying sane and getting dinner on the table?
It’s called the Crock-Pot!
This morning, before I left for work, I put four chicken breasts in the Crock-Pot with a bunch of BBQ sauce.  When I came home from work, (after dealing with a natural gas leak, a gazillion kids who couldn’t get home, making phone calls to families, and then getting stuck behind a big accident on my alternate route home) dinner was almost ready.  I took a frozen pizza crust out of the freezer, topped it with the cooked chicken and a bit of the sauce it was cooking in, added some chopped onion and cilantro (fresh from my garden), and a little mozzarella cheese.  I baked it up for a few minutes and dinner was finished!
I’m telling you… that Crock-Pot is my BFF.  Want to know my other secret?  There’s a lot of paper-plate-eating these days.  Ooh, I can’t forget to tell you, I also called, “Family Clean Up!” when dinner was just about over.  I sat myself down to fold laundry and my kids and hubby emptied the dish washer and threw away our paper plates.  

With my trusty Crock-Pot, paper plates, and help from my family, I think I’m going to make it…
just maybe!

Share this:

  • Click to share on Facebook (Opens in new window)
  • Click to share on Twitter (Opens in new window)
  • Click to share on Pinterest (Opens in new window)

Filed Under: Miscellaneous Tagged With: crockpot love, recipes, teaching

  • 1
  • 2
  • Next Page »

Welcome

Hello, Friends. I'm Becca. I'm a teacher, and when I'm not in the classroom, I'm doing everything I can to create a happy home. I love to cook, bake, garden, sew, quilt, teach, and simply spend time with my family. I don't consider myself to be an artist, but I strive to find the art in the everyday things I do to make our house a home. Join me as I quilt you up some comfort or warm you with some cookies!

Connect

youtubegoogleplusinstagrampinteresttwitterfacebooketsyemail tpt icon for blog

Search This Blog

Archives

Categories

  • Baking
  • Cooking
  • Decorating
  • Embroidery
  • Garden
  • hobbies
  • Home and Family Friday
  • Kids
  • Miscellaneous
  • Organization
  • Outdoor
  • Parties
  • Photography
  • Quilting
  • Sewing

My Family

Autumn/Winter 2011 Idea Book

Stamp of the Month

Shop With Me!

About Me

Hello, Friends. I'm Becca. I'm a teacher, and when I'm not in the classroom, I'm doing everything I can to create a happy home. I love to cook, bake, garden, sew, quilt, teach, and simply spend time with my family. I don't consider myself to be an artist, but I strive to find the art in the everyday things I do to make our house a home. Join me as I quilt you up some comfort or warm you with some cookies!

Copyright © 2023 · Migrate with Fabulous Blogging · Log in